

Azure HPC Recipe Document for Altair Acusolve
1 Introduction
This document briefly explains the steps to install and run Altair AcuSolve application on a Virtual Machine deployed in Azure Cloud Platform and presents the performance results.
This recipe document covers the following topics: -
- How to deploy and connect to the given virtual machine on Azure
- How to deploy an Azure CycleCloud and run the workloads on multi node.
- Install AcuSolve on virtual machine
- Install AcuSolve license manager
- AcuSolve Performance results on Azure virtual machine
- Azure consumption
- Summary
2 Deploy Virtual Machine on Azure Cloud Platform
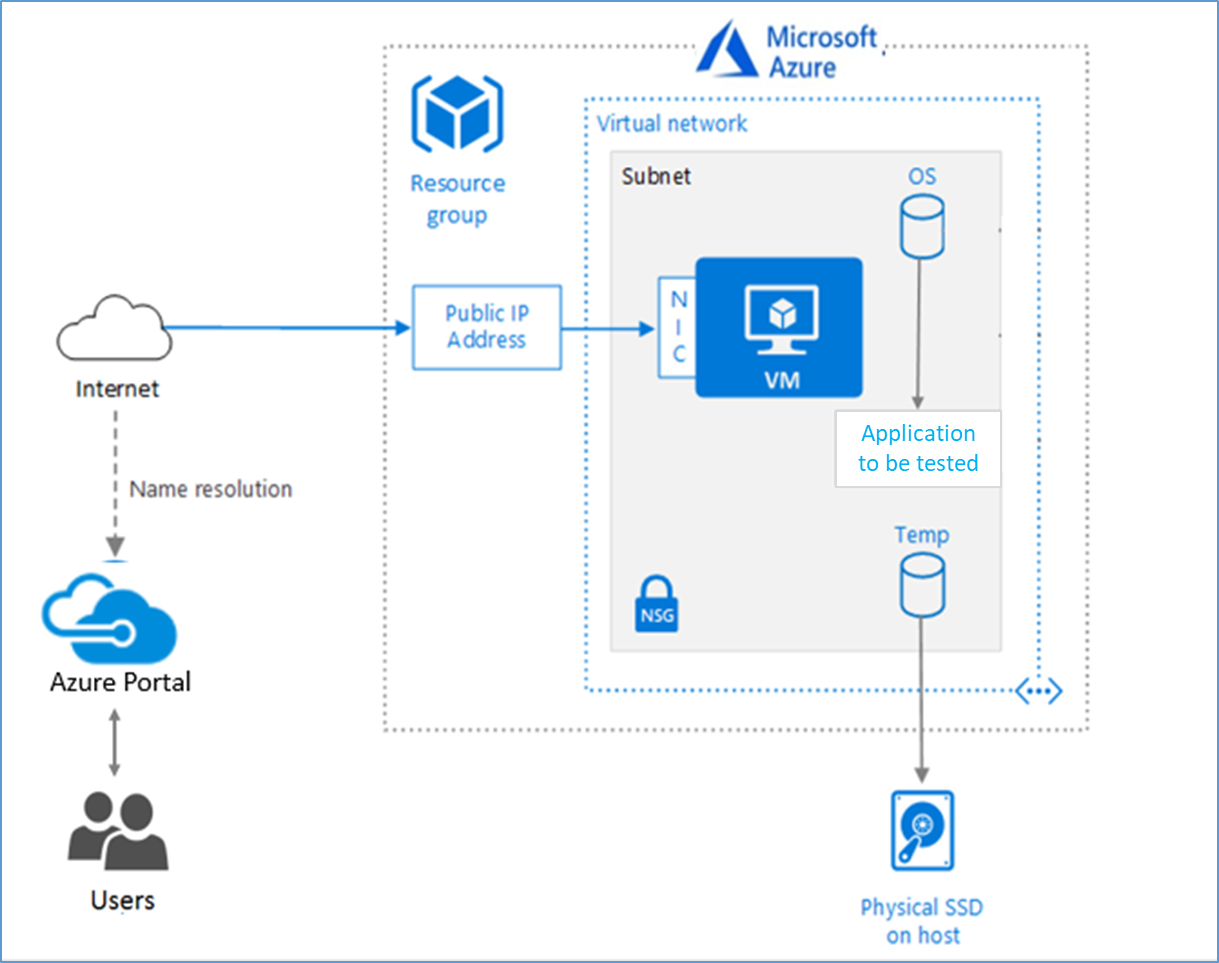
2.1 Azure Cloud Architecture for Application
The below Architecture explains the virtual machine running on an Azure Platform
2.2 Azure Virtual Machine (VM)
A VM is a virtualized instance of a computer that can perform almost all the same functions as a computer, including running applications and operating systems.
An Azure VM gives the flexibility of virtualization without having to buy and maintain the physical hardware that runs it. However, the user still needs to maintain the VM by performing tasks, such as configuring, patching, and installing the software that runs on it.
Things to be considered before deploying a VM,
- The names of the application resources
- The location where the resources are stored
- The size of the VM
- The operating system that the VM runs
- The configuration of the VM
- The related resources that the VM needs
There are different sizes and options available for the Azure virtual machines and user can use to run apps and workloads. Depending on the workload user must choose the appropriate VM size. For complete list check this https://docs.microsoft.com/en-us/azure/virtual-machines/sizes/.
To test the performance of Altair AcuSolve on Azure Platform, HBv3-series virtual machine is deployed.
|
Size |
vCPU |
RAM Memory: GiB |
Memory bandwidth GB/s |
Base CPU frequency (GHz) |
All-cores frequency (GHz, peak) |
Single-core frequency (GHz, peak) |
RDMA performance (Gb/s) |
Max data disks |
|
Standard_HB120rs_v3 |
120 |
448 |
350 |
2.45 |
3.1 |
3.675 |
200 |
32 |
|
Standard_HB120-64rs_v3 |
64 |
448 |
350 |
2.45 |
3.1 |
3.675 |
200 |
32 |
The current virtual machine HBv3-series VMs are optimized for HPC applications such as fluid dynamics, explicit and implicit finite element analysis, weather modelling, seismic processing, reservoir simulation, and RTL simulation. HBv3 VMs feature up to 120 AMD EPYC™ 7003-series (Milan) CPU cores, 448 GB of RAM, and no hyper-threading. HBv3-series VMs also provide 350 GB/sec of memory bandwidth; up to 32 MB of L3 cache per core, up to 7 GB/s of block device SSD performance, and clock frequencies up to 3.675 GHz.
2.3 Create a Virtual Machine on Azure Platform
Sign into Azure
Sign into the Azure portal by using https://portal.azure.com/
Free Trial subscriptionsaren't eligible for limit or quota increases.
After the successful sign in or sign up, one has to upgrade the Azure subscription to Pay-As-You-Go to deploy a Virtual machine. For deployment, the user must have regional vCPU quota which can be obtained by raising a request.
The step-by-step procedure to increase the vCPU quota is given below,
https://docs.microsoft.com/en-us/azure/azure-portal/supportability/per-vm-quota-requests
The step-by-step procedure to deploy Virtual machine is given below,
- Type virtual machines in the marketplace search.
- Under Services, select Virtual machines.
- In the Virtual machines page, select Create Then Virtual machine.
- In the Basics tab, under Project details, make sure the correct subscription is selected and then choose to Create new resource group. Type Azure-PerformanceTest(user choice) for the name.

- Under Instance details, type Azure-VM (user choice) for the Virtual machine name and choose West Europe for Region. Choose CentOS, Version 8.1 HPC-Gen2 for the Image and Standard_HB120rs_v3 for the Size (user choice). Leave the other defaults.

Note:
- Region must be decided based on where the Virtual machine is going to be deployed. To avoid the network latency, the region should be near to the location where the VM is to be deployed.
- Image selection is of user choice based on the application user can choose the image (Windows 10, Linux based OS and Windows Server)
- Under Administrator account, provide a username, such as Azureuser and a password. The password must be at least 12 characters long and meet the defined complexity requirements.

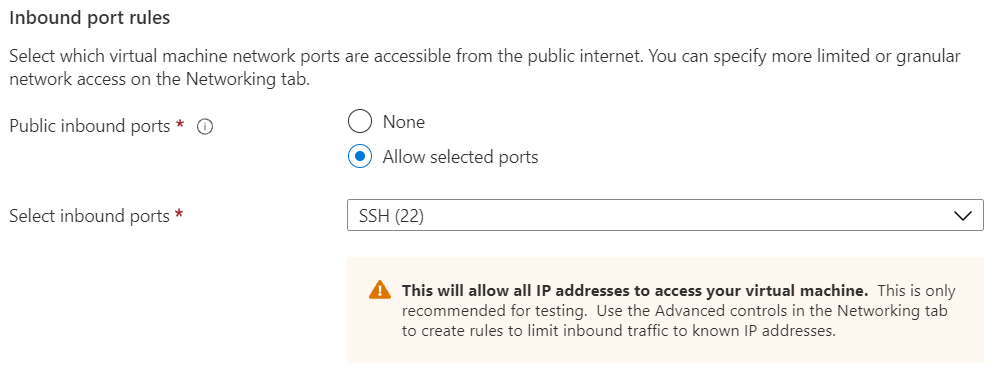
- Under Inbound port rules, choose Allow selected ports and then select SSH (22) from the drop-down.
- In Advanced tab, under the Extensions click Select an extension to install (depends on user requirement)
- Leave the remaining defaults and then select the Review + create button at the bottom of the page.
- After validation runs, select the Create button at the bottom of the page.

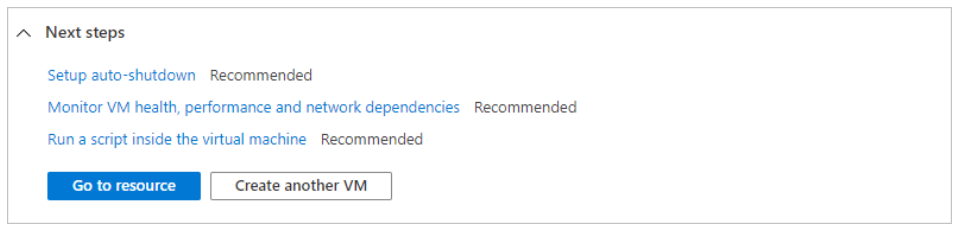
- After deployment is complete, select Go to resource.
2.4 Connect to virtual machine
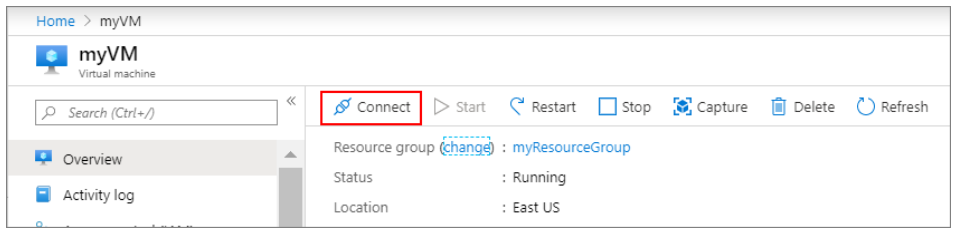
Create a SSH connection to the virtual machine.
- On the overview page of a virtual machine, select the Connect button then select SSH and copy the public IP address.
- Open any SSH client tool of user choice, in this case PUTTY is used.
- Enter the IP address and port as 22 and click Open
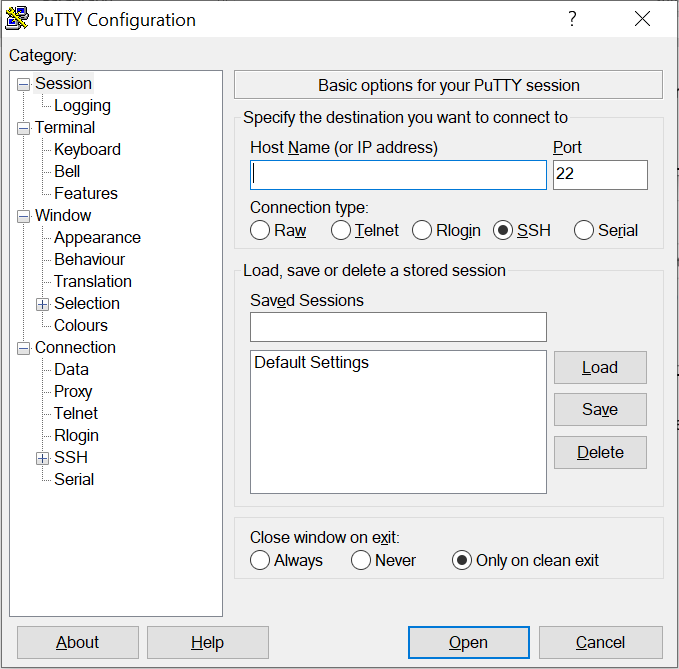
- Enter username in Login as and enter the password and click Enter.
- Now user connected to the VM in Console
3 Install Altair AcuSolve Application on Azure Virtual Machine
3.1 Download product
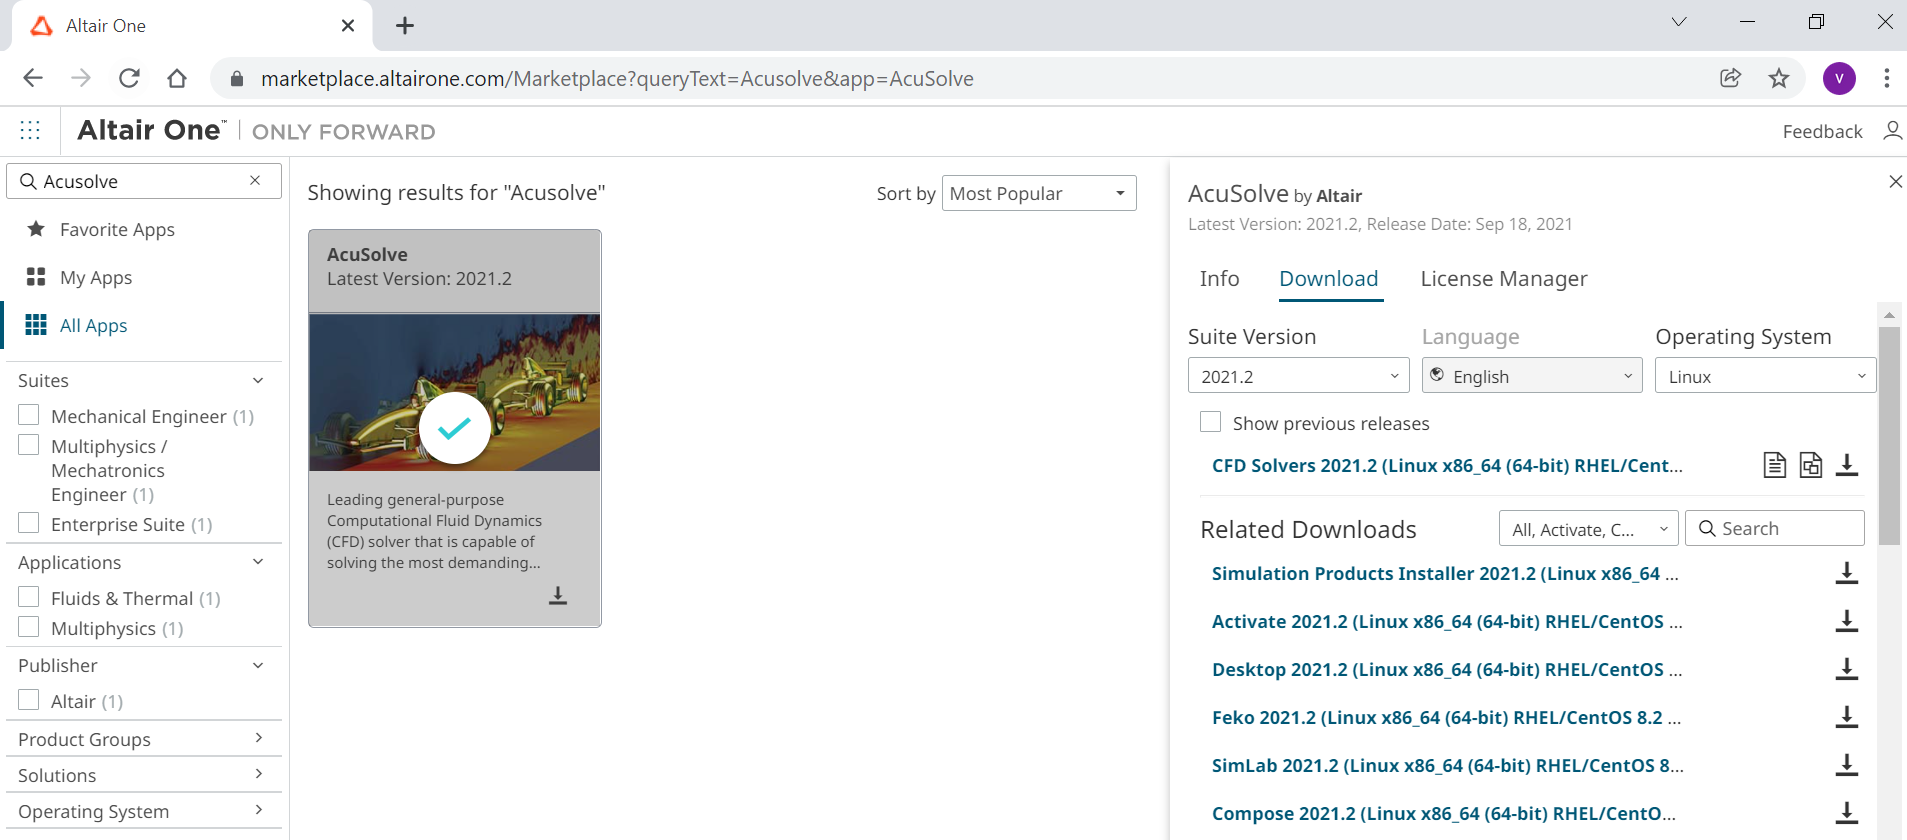
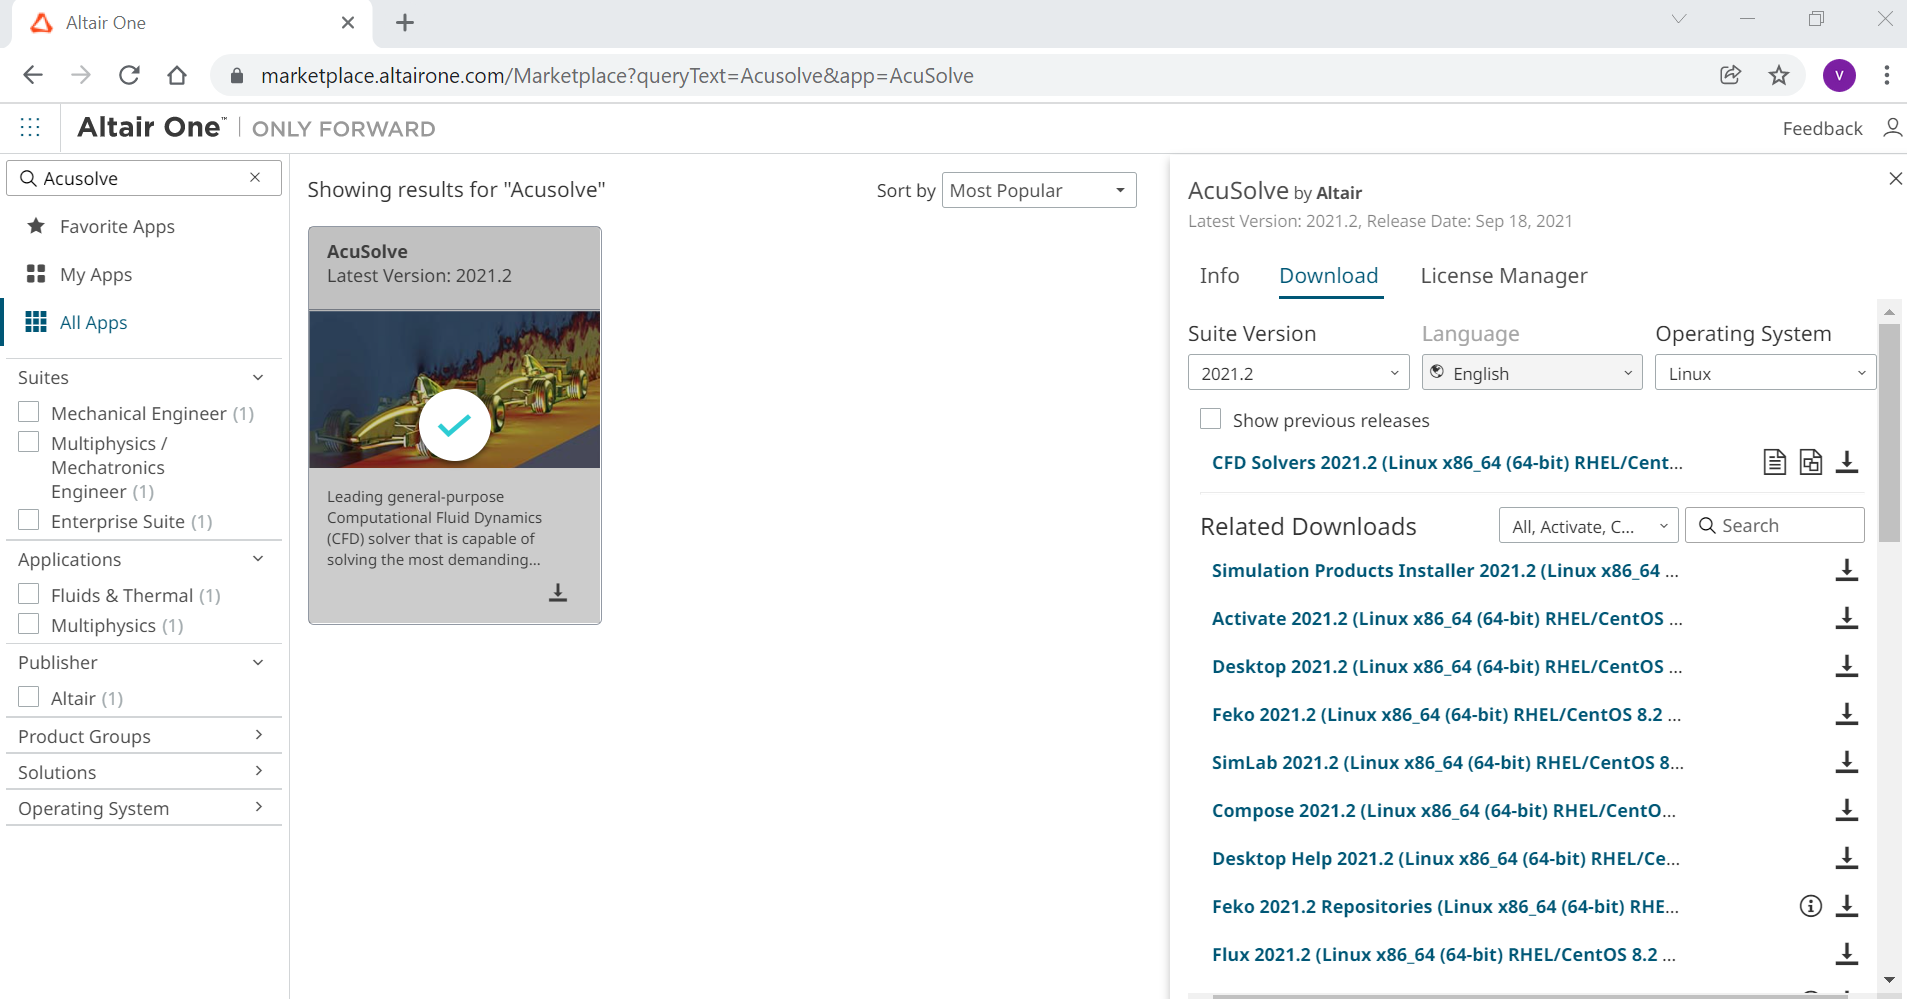
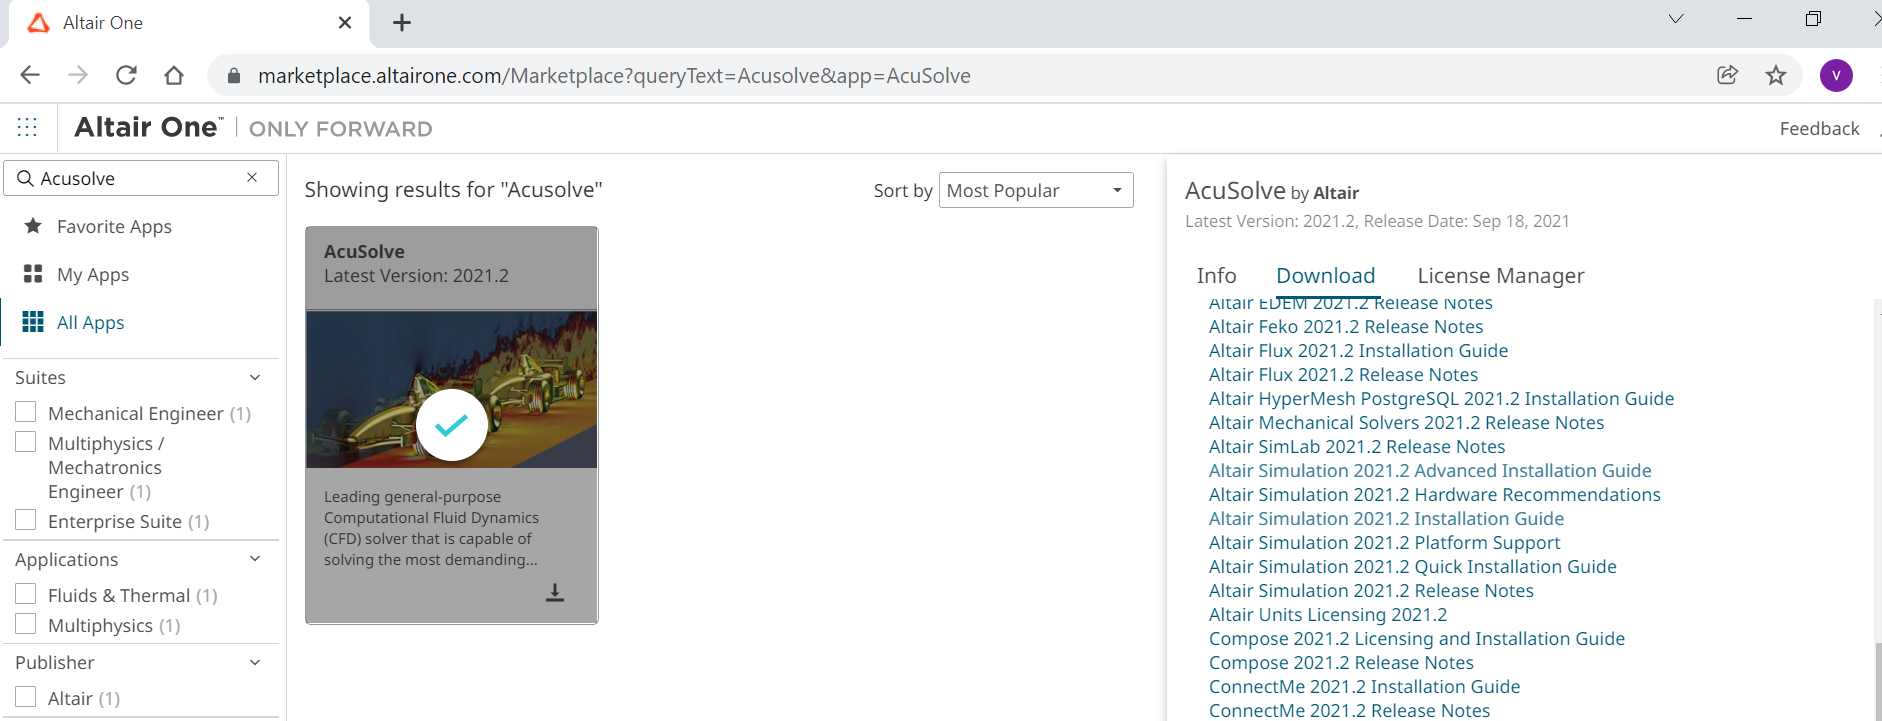
Instructions on how to download Altair products from Altair One Marketplace. Before beginning, open Altair One Marketplace in a web browser and log on.
- Type AcuSolve in the search box and press Enter.
- In the right pane of the web browser, click the Download tab.
- From the Suite Version drop-down menu, select a suite version.
- From the Operating System drop-down menu, select a platform.
At this point of time, AcuSolve is only available for Linux platform (Operating system drop down menu selection is not editable at the moment).
- Click the Download button to the right of each software package to download and click the download icon.
![]()
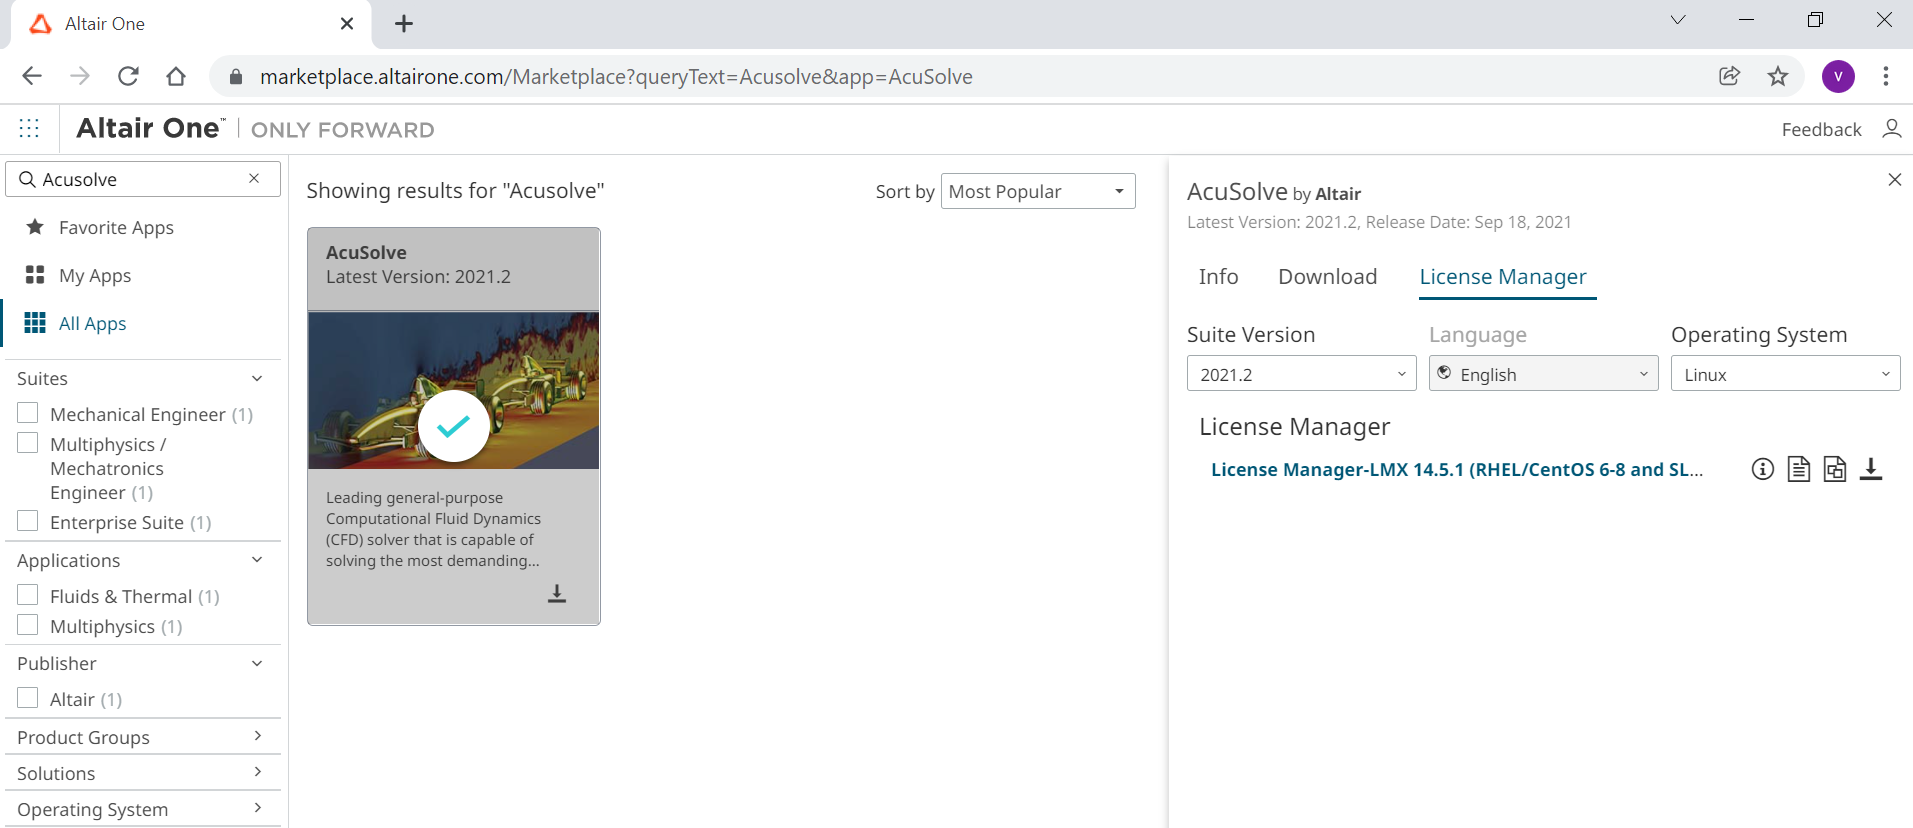
- Click the License Manager tab button to the right of each software package to download and click the download icon.
![]()
3.2 Install AcuSolve application on Linux
The step-by-step procedure for product installation is given below,
- Open a command terminal window/prompt.
a) cd – change directory – to the location where the installer executable resides.
b) Execute the sh command on the installer binary with the additional parameter "-i console",
for example, sh hwCFDSolvers2021.2_linux64.bin -i console.
- In the multi-language selector prompt, select the proper locale and press Enter to continue.
- In the License Agreement panel, hit any key and press Enter to advance, or type 0 and press Enter to proceed to the acceptance of the license agreement. Type Y and press Enter to accept the agreement.
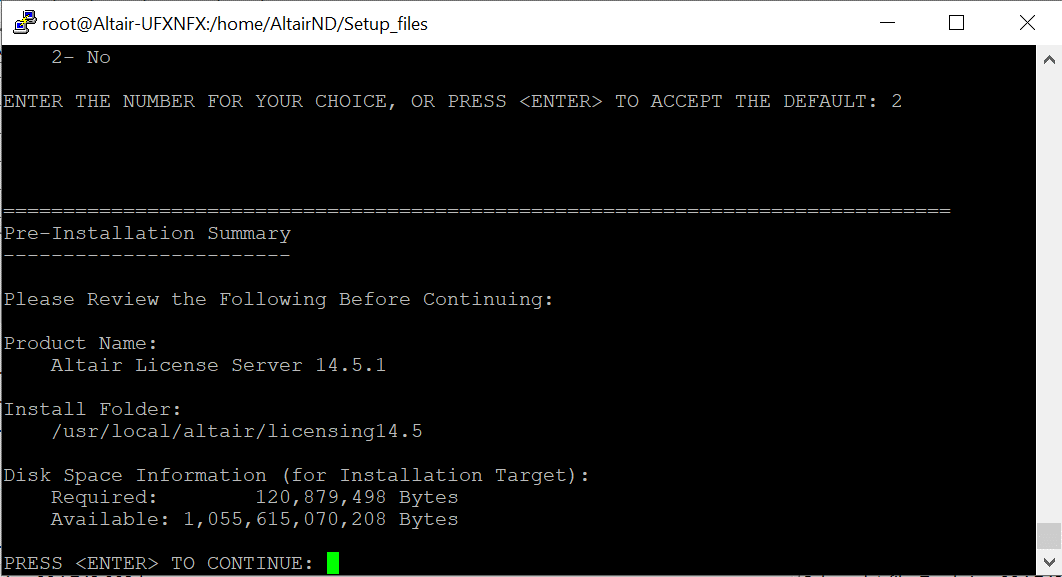
- In the Pre-Installation Summary panel, review the Product Features list, Install Folder and disk space requirements. Press Enter to continue
- Follow the prompt to complete the installation.
- Once the installation completes, press Enter to exit the installer
For more information, the installation guide can be found in readme file, which is shown below,
![]()
3.3 License Manager installation
The License manage step by step installation procedure is given below,
- Open a command terminal window/prompt.
a) cd – change directory – to the location where the installer executable resides.
- Log in as root on the machine where the license package will be installed.
User need to log in as root to set up the license in it scripts to automatically launch the daemons at boot time.
- Execute the installer package.
for example, sh altair_licensing_14.5.1.linux_x64.bin -i console
- Follow the prompt to continue installation.
- In the Pre-Installation Summary panel, review the Product Features list, Install Folder and disk space requirements. Press Enter to continue
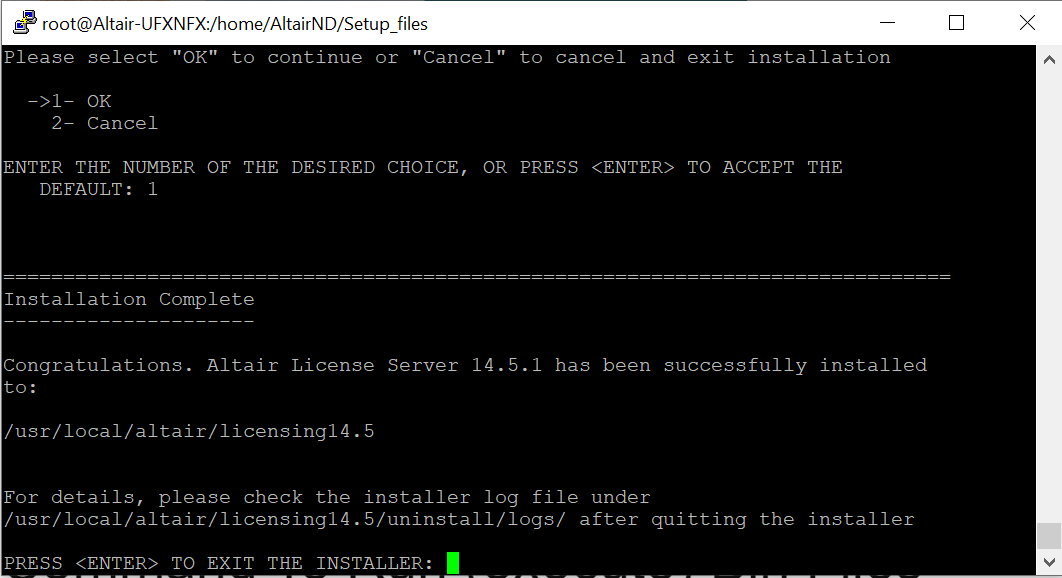
- Follow the prompt to complete the installation.
- Once the installation completes, press Enter to exit the installer
The following steps explains license activation for Hosted Altair Units (HAU) system to manage the Licenses.
Pre-requisites: To use the HAU system user must first have a valid Altair Connect user account, and account (user’s company account) must have purchased and enabled Hosted Units. Check with the administrator if needed.
Once above pre-requisites are met, user should be able to see the HAU or Hosted Units menu on the left-hand side. There are both administrative functions (if user is one of the company's designated admins) and user functions. This section will cover the typical user functions such as authorizing a machine to use HAU.
- The command line utility almutil is in the install directory, navigate to the directory where almutil resides.
- To authorize a machine, obtain the authorization code by logging in to Altair Connect, click HHWU User and click Generate New Token.
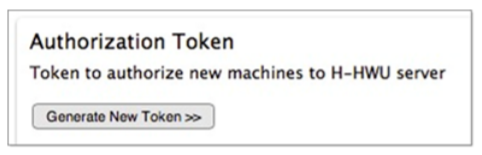
- Highlight the code and copy it using in browser, or simply keep the window available to see the code.
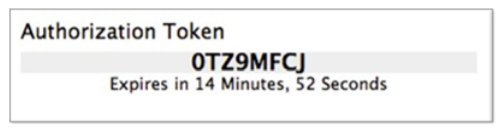
- Enter the authorization code into the command prompt
Use the following command, replacing YOURCODE with the code obtained from Altair portal
./almutil -hhwuauth -code YOURCODE
- The below image shows the successful authorization of machine.

The detailed instruction can be found in the below highlighted document
![]()
4 Azure HPC Cluster with Azure CycleCloud (Multi-Node)
Users can easily deploy an HPC Cluster on Azure Cloud Platform using Azure Cycle Cloud
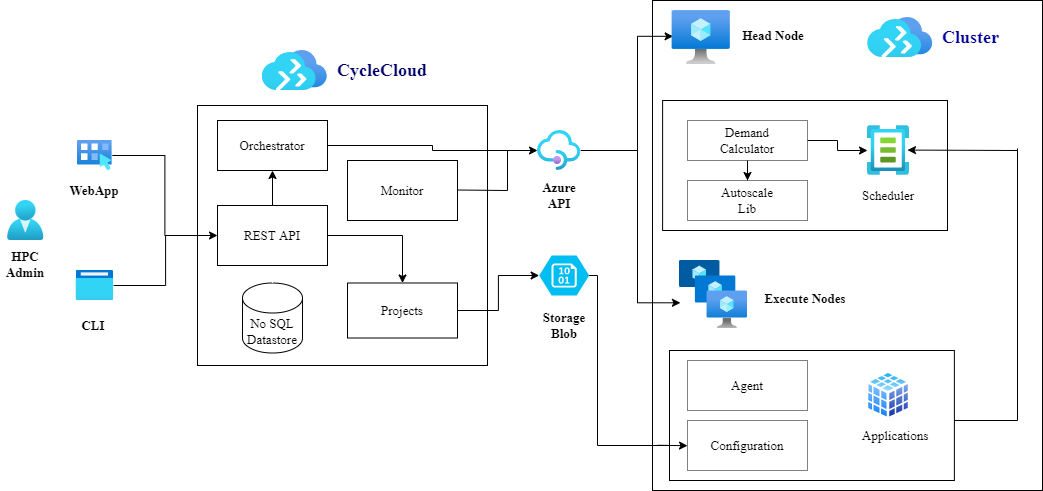
Azure CycleCloud is an enterprise-friendly tool for orchestrating and managing High Performance Computing (HPC) environments on Azure. With CycleCloud, users can provision infrastructure for HPC systems, deploy familiar HPC schedulers, and automatically scale the infrastructure to run jobs efficiently at any scale. Through CycleCloud, users can create different types of file systems and mount them to the compute cluster nodes to support HPC workloads
Azure CycleCloud is a Linux-based web application, which you can install and use in any location with connectivity to Azure. The simplest, Microsoft-recommended way of setting it up is by deploying an Azure VM based on a preconfigured Azure Marketplace image.
4.1 Azure HPC Cycle cloud Architecture
4.2 Setup a HPC Cluster on Azure Platform using Azure cycle cloud
The following steps are involved in setting up the HPC Cluster on Microsoft Azure platform.
- Deploy an Azure CycleCloud Azure VM
- Connect to the Azure CycleCloud Azure VM
- Add an Azure subscription to Azure CycleCloud
- Prepare for the deployment of an HPC cluster
- Create an HPC cluster by using Azure CycleCloud
- Configure and start an HPC cluster by using Azure CycleCloud
The detailed step by step instructions to Install and configure Azure CycleCloud is given in the below link,
The detailed step-by-step instructions to Create an HPC cluster from built-in templates are given in the below link,
4.3 Connect to Head Node (Scheduler VM)
The following points shows instructions to connect to the head node.
- Sign into the Azure portal by using https://portal.azure.com/
- Start the Azure cycle cloud VM
- Connect to Azure cycle cloud VM’s IP through web browser
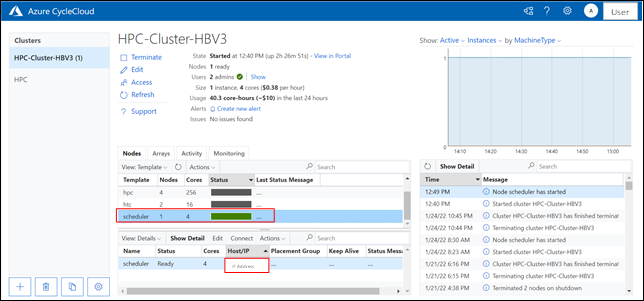
- Start the cluster from the CycleCloud web-based GUI
- Click on the scheduler as shown below
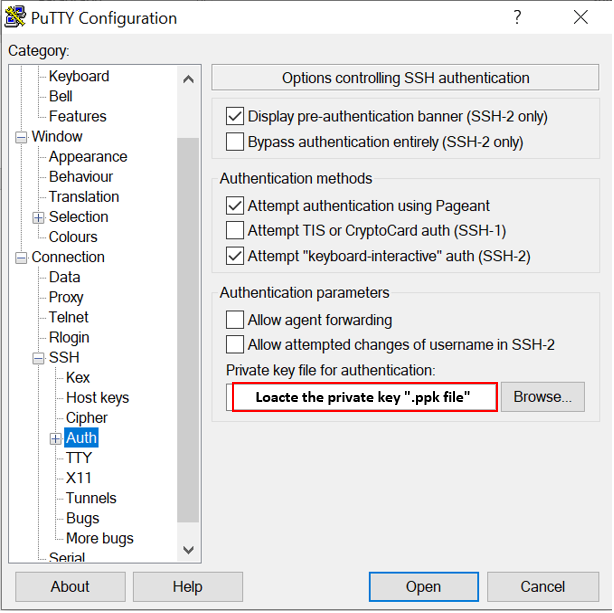
- Open any SSH client tool of user choice, in this case PUTTY is used.
- Enter the IP address and port as 22.
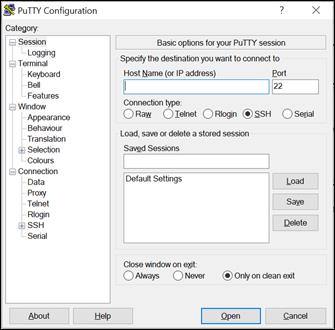
- Select the Auth under SSH tab and add the private key file and click Open
- Enter the username in the prompt.
- Now user is connected to the Head node.
4.4 Application Installation on Multi Node.
- The installation procedure of HPC Multi-Node cluster remains same as the single node installation, except for the path to the installation directory.
- See Section 3.2 & 3.3 for Altair AcuSolve application along with license manager Installation respectively.
- For single node, the installation directory path is the default path (notice Install folder path in chapter 3.3, point 5), however for multi-node setup the user must select the Installation directory path as /shared, so that the directory will be accessible for all the nodes
- The Shared folder path depends upon Network Attached Storage such as an NFS server or BeeGFS cluster, Azure NetApp Files, Azure HPC Cache, and Azure AD DS.
- To authorize the multi node VMs to access License, the user must include the authorization script in the JOB script. See Section 3.3 for Authorization Code.
5 Performance Results of AcuSolve on Azure Virtual Machines
5.1 Altair AcuSolve Overview
AcuSolve is a leading general purpose CFD solver that can solve the most demanding industrial and scientific applications.
Based on the Finite Element method, AcuSolve’s robust and scalable solver technology empowers you by providing unparalleled accuracy on fully unstructured meshes. Applications ranging from steady Reynolds-averaged Navier-Stokes (RANS) simulations to complex, transient, multi-physics simulations are handled with ease and accuracy. AcuSolve is used worldwide by scientists and engineers to explore applications in a variety of markets including automotive, aerospace, energy, electronics cooling and chemical processing
The key benefits of AcuSolve include:
- Robustness: Most problems are solved on the first attempt
- Speed: Fully coupled solver on hybrid shared memory and distributed parallel systems
- Accuracy: Highly accurate in space and time while globally and locally conservative in accordance with the Galerkin/Least-square (GLS) Finite Element method.
5.1.1 Model Details
For testing AcuSolve on Single Node Configurations, two models were used
1) Backward facing step (0.27 million elements)
2) Impinging Nozzle (7.6 million elements)
The details of the Backward facing step model are shown below

Figure 1: Backward facing step
Details of Impinging Nozzle model
|
Model details |
|
|
Model Name |
Impinging Nozzle |
|
Type |
Steady |
|
Turbulence model |
spalart_allmaras |
|
No of elements |
7690844 |
|
No of Nodes |
7855017 |
|
max_time_steps |
200 |
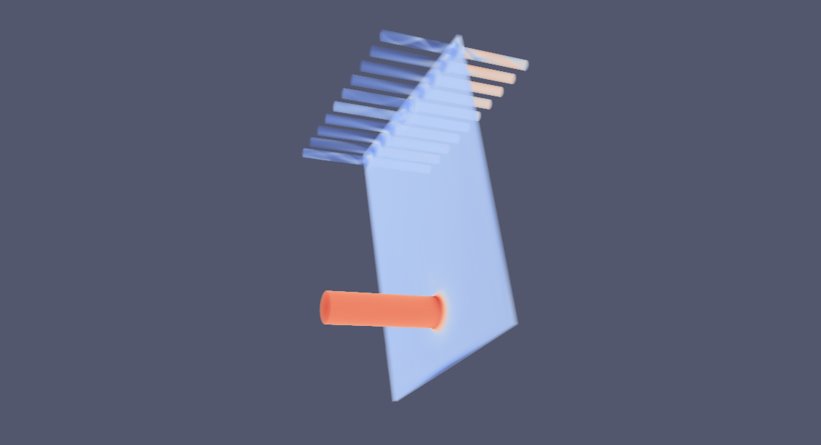
Figure 2: Impinging Nozzle
5.2 Altair AcuSolve Performance on Azure Platform
When it comes to performance parameters for CFD Applications, Computation time or wall clock time is one of the parameters which need to be analysed. Altair AcuSolve is tested on Azure HBv3 Virtual Machine. The HBv3 VMs feature up to 120 AMD EPYC™ 7003-series (Milan) CPU cores, 448 GB of RAM, and no Hyper-threading. For this Benchmarking exercise of AcuSolve, we have used Linux platform with Azure HPC Market-place Image (CentOS-based 8.1 HPC –Gen2)
|
Operating system Details |
|
|
Operating system version |
CentOS Linux release 8.1.1911 (Core) |
|
OS Architecture |
X86-64 |
|
MPI |
Intel MPI |
5.3 Altair AcuSolve 2021.2 Performance Results for Single-Node Configuration
This performance evaluation is carried out on two different variants of HBv3 Series Virtual Machines. i.e Standard_HB120rs_v3 with 120 CPUs and Standard_HB120-64rs_v3 with 64 CPUs
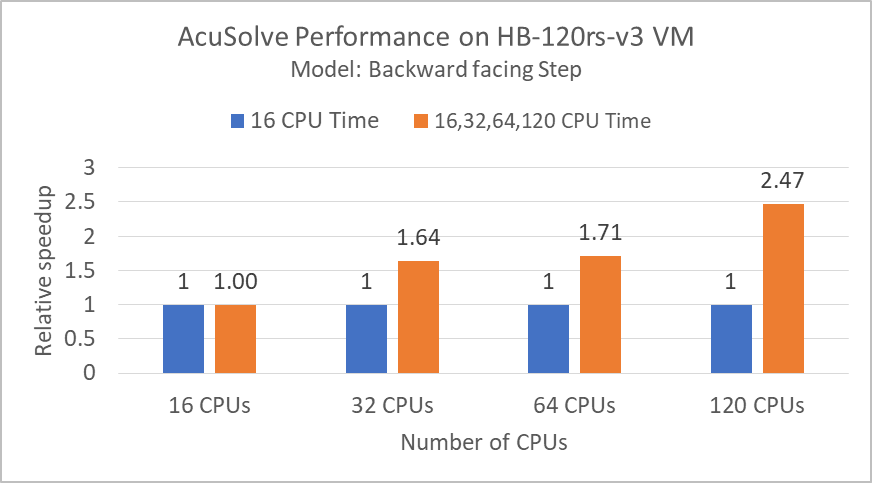
5.3.1 Performance Results on Standard_HB120rs_v3 with 120 vCPUs
Model: Backward facing step
In this benchmarking exercise, AcuSolve is used to simulate fully developed turbulent flow over a backward-facing step. For this case, the simulations are run by altering the number of processors or CPUs on the same VM Instance and the total computation time is calculated for each run.
|
VM Type |
No of processors |
Elapsed Time (sec) |
|
Standard_HB120rs_v3 |
120 |
130.8 |
|
Standard_HB120rs_v3 |
64 |
188.7 |
|
Standard_HB120rs_v3 |
32 |
196.4 |
|
Standard_HB120rs_v3 |
16 |
322.9 |
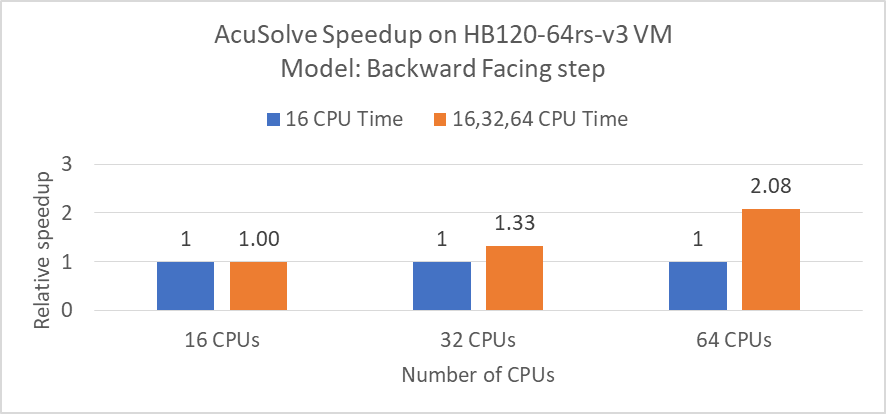
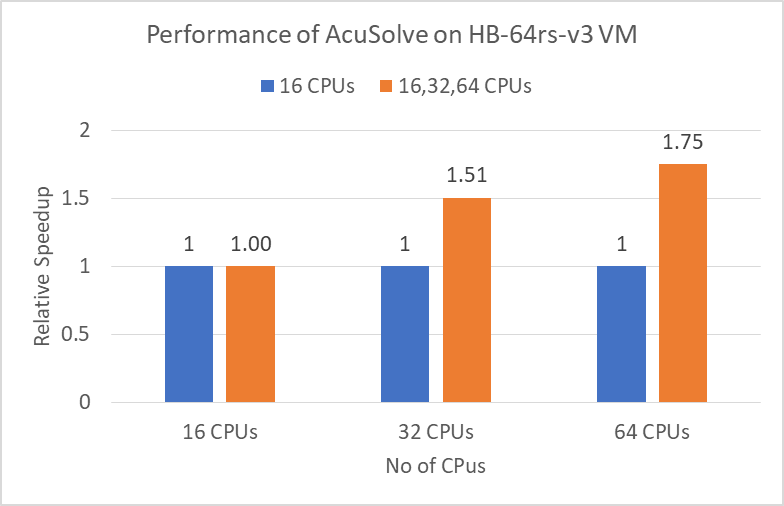
5.3.2 Performance Results on Standard_HB120-64rs_v3 with 64 vCPUs
Model: Backward facing step
Model: Impinging Nozzle
From the above results of both the VM configurations, we can see a better performance result from the Standard_HB64rs_v3 VM with 64 cores on the backstep model. So for the bigger model (impinging nozzle), we selected Standard_HB64rs_v3 with 64 cores for the performance evaluation.
|
VM Type |
No of Cores |
Elapsed Time (hours) |
|
Standard_HB64rs_v3 |
16 |
13.48 |
|
Standard_HB64rs_v3 |
32 |
8.95 |
|
Standard_HB64rs_v3 |
64 |
7.7 |
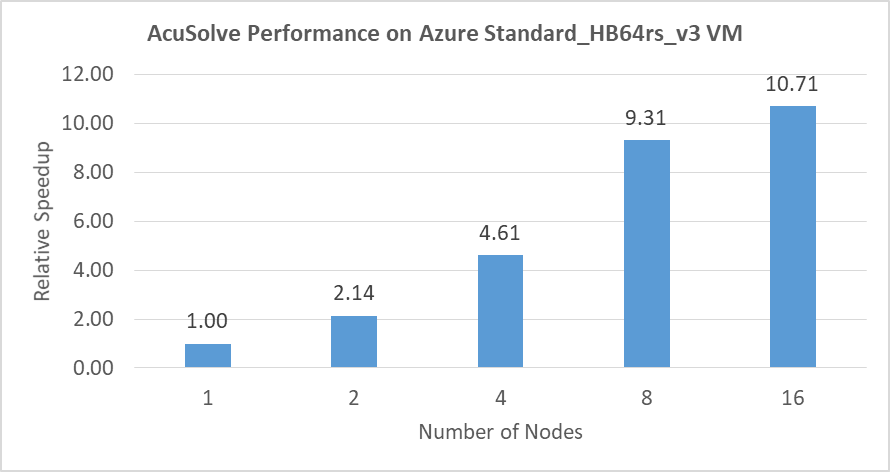
5.4 AcuSolve Performance on Azure HPC Multi-Node Configuration:
AcuSolve is tested on Azure HPC Cluster using Standard_HB64rs_v3 (64 Cores) Virtual Machine Instance with 1,2,4,8 and 16 Nodes. For Testing multi-node configuration, Impinging Nozzle model with 7.6 million elements is used and the performance results are shown below.
|
VM Type |
Number of Nodes |
No of Cores |
Elapsed Time (sec) |
|
Standard_HB64rs_v3 |
1 |
64 |
27706 |
|
Standard_HB64rs_v3 |
2 |
128 |
12940 |
|
Standard_HB64rs_v3 |
4 |
256 |
6016 |
|
Standard_HB64rs_v3 |
8 |
512 |
2975 |
|
Standard_HB64rs_v3 |
16 |
1024 |
2586 |
6 Azure Cost Details
For the below cost reports, the application installation time is not considered and only wall clock time is considered for the cost calculation. The Hourly rates reported are subject to change. For the current rate please refer the link https://azure.microsoft.com/en-in/pricing/calculator/
Single-Node Performance cost for 2 models (Backstep and impinging nozzle)
|
Azure VM Size |
# CPUs |
Wall clock time in Hours |
Azure VM Hourly Cost |
Total Azure cost |
|
Standard_HB120rs_v3 |
16 |
0.09 |
$4.68 |
$0.42 |
|
32 |
0.05 |
$4.68 |
$0.23 |
|
|
64 |
0.05 |
$4.68 |
$0.23 |
|
|
120 |
0.04 |
$4.68 |
$0.19 |
|
Azure VM Size |
# CPUs |
Wall clock time in Hours |
Azure VM Hourly Cost |
Total Azure cost |
|
Standard_HB64rs_v3 |
16 |
13.55 |
$4.68 |
$63.41 |
|
32 |
9.01 |
$4.68 |
$42.17 |
|
|
64 |
7.74 |
$4.68 |
$36.22 |
Multi-Node Performance cost for 1 model (Impinging nozzle)
|
Azure VM Size |
# Nodes |
# CPUs |
Wall clock time in Hours |
Azure VM Hourly Cost |
Total Azure cost |
|
Standard_HB64rs_v3 |
1 |
64 |
7.70 |
$4.68 x 1 |
36.02 |
|
2 |
128 |
3.59 |
$4.68 x 2 |
33.64 |
|
|
4 |
256 |
1.67 |
$4.68 x 4 |
31.28 |
|
|
8 |
512 |
0.83 |
$4.68x 8 |
30.94 |
|
|
16 |
1024 |
0.72 |
$4.68 x 16 |
53.79 |
7 Summary
- Altair AcuSolve is tested successfully on both the Azure Standard_HB120rs_v3 and Standard_HB120-64rs_v3 Virtual Machines.
- On a Single node, we can observe a performance speedup up to 2.47 with 120 vCPUs on Standard_HB120rs_v3 when we take the 16 CPUs run wall clock time as base time.
- On a Single node, we can observe a speedup up to 2.08 with 64 vCPUs on Standard_HB120-64rs_v3 when we take the 16 CPUs run wall clock time as base time.
- AcuSolve can Scaleup linearly very well up to 8 nodes on an Azure HPC cluster with Standard_HB120-64rs_v3 Virtual Machine Instances having 64 cores on each node. We can see a speed-up value of 9.31 with 8 nodes configuration, which is a very good performance value for AcuSolve on HPC Cluster. Continued scalability can also be demonstrated beyond 8 nodes when a higher number of finite element nodes are simulated.
2 Deploy Virtual Machine on Azure Cloud Platform
2.1 Azure Cloud Architecture for Application
2.2 Azure Virtual Machine (VM)
2.3 Create a Virtual Machine on Azure Platform
2.4 Connect to virtual machine
3 Install Altair® AcuSolve® Application on Azure Virtual Machine
3.2 Install AcuSolve application on Linux
3.3 License Manager installation
4 Azure HPC Cluster with Azure CycleCloud (Multi-Node)
4.1 Azure HPC Cycle cloud Architecture
4.2 Setup a HPC Cluster on Azure Platform using Azure cycle cloud
4.3 Connect to Head Node (Scheduler VM)
4.4 Application Installation on Multi Node.
5 Performance Results of AcuSolve on Azure Virtual Machines
5.2 Altair AcuSolve Performance on Azure Platform
5.3 Altair AcuSolve 2021.2 Performance Results for Single-Node Configuration
5.3.1 Performance Results on Standard_HB120rs_v3 with 120 vCPUs
5.3.2 Performance Results on Standard_HB120-64rs_v3 with 64 vCPUs
5.4 AcuSolve Performance on Azure HPC Multi-Node Configuration: