

Azure HPC Recipe Document for Barracuda Virtual Reactor
This document briefly explains the steps to install and run Virtual Reactor application on a Virtual Machine deployed in Azure Cloud Platform and presents the performance results.
This recipe document covers the following topics: -
- Deploy & connect a required virtual machine on Azure platform.
- Install required NVIDIA drivers in virtual machine.
- Install Application on virtual machine.
- Install license manager for current application
- Performance results of current application on azure virtual machine
- Azure cost
- Summary
2 Deploy Virtual Machine on Azure Cloud Platform
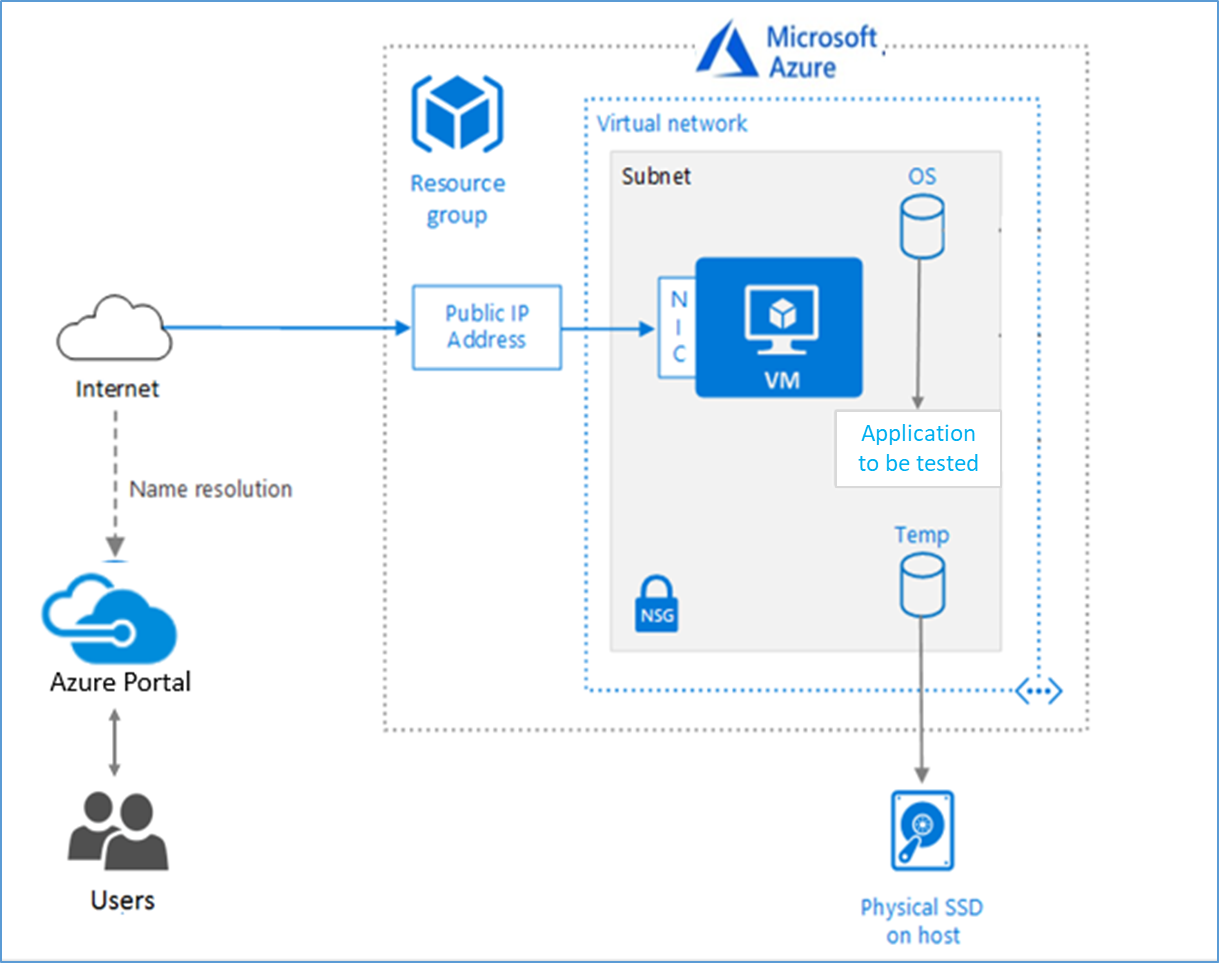
2.1 Azure Cloud Architecture for Application
The below Architecture explains the virtual machine running on an Azure Platform
2.2 Azure Virtual Machine (VM)
A VM is a virtualized instance of a computer that can perform almost all the same functions as a computer, including running applications and operating systems.
An Azure VM gives the flexibility of virtualization without having to buy and maintain the physical hardware that runs it. However, the user still needs to maintain the VM by performing tasks, such as configuring, patching, and installing the software that runs on it.
Things to be considered before deploying a VM,
- The names of the application resources
- The location where the resources are stored
- The size of the VM
- The operating system that the VM runs
- The configuration of the VM
- The related resources that the VM needs
There are different sizes and options available for the Azure virtual machines and user can use to run apps and workloads. Depending on the workload user must choose the appropriate VM size. For complete list, check this https://docs.microsoft.com/en-us/azure/virtual-machines/sizes/.
To test the performance of Virtual Reactor on Azure Platform, NDv4 A100, NCv3-series& NCas_T4-v3-series virtual machines are deployed.
|
VM Name |
vCPU |
Memory (GiB) |
SSD (GiB) |
GPU |
GPU Memory (GiB) |
Max Data Disk |
|
Standard_ND96asr_v4 |
96 |
921 |
1024 |
8 A100 |
40 |
32 |
|
Standard NC24s_v3 |
24 |
448 |
2048 |
4 V100 |
16 |
32 |
|
Standard NC64as_T4_v3 |
64 |
448 |
1024 |
4 T4 |
16 |
32 |
1. Standard_ND96asr_v4: This VMs is powered by NVIDIA Ampere A100 Tensor Core GPUs and 96 physical 2nd-generation AMD Epyc™ CPU cores (2.44GHz). The “ND96asr_v4” VM has 8 GPUs with 40 GB of memory each and supported by 96 AMD processor cores with a total memory of 921GB. Each GPU features NVLINK 3.0 connectivity for communication within the VM.
2. Standard NC24s_v3: This VM belongs to Ncv3-series This VMs are powered by NVIDIA Tesla V100 GPUs. These GPUs can provide 1.5x the computational performance of the NCv2-series.
3. Standard NC64as_T4_v3: This VM Belongs to NCasT4_v3-series.These Series VMs are powered by Nvidia T4 GPUs and AMD EPYC 7V12(Rome) CPUs. The “NC64as_T4_v3” VM has 4 NVIDIA T4 GPUs with 16 GB of memory each, up to 64 non-multithreaded AMD processor cores with a total memory of 448GB.
2.3 Create a Virtual Machine on Azure Platform
Sign into Azure
Sign into the Azure portal by using https://portal.azure.com/
Free Trial subscriptions are not eligible for limit or quota increases.
After the successful sign in or sign up, one has to upgrade the Azure subscription to Pay-As-You-Go to deploy a Virtual machine. For deployment, the user must have regional vCPU quota, which can be obtained by raising a request.
The step-by-step procedure to increase the vCPU quota is given below,
https://docs.microsoft.com/en-us/azure/azure-portal/supportability/per-vm-quota-requests
The step-by-step procedure to deploy Virtual machine is given below,
1. Type virtual machines in the marketplace search.
2. Under Services, select Virtual machines.
3. In the Virtual machines page, select Create Then Virtual machine.
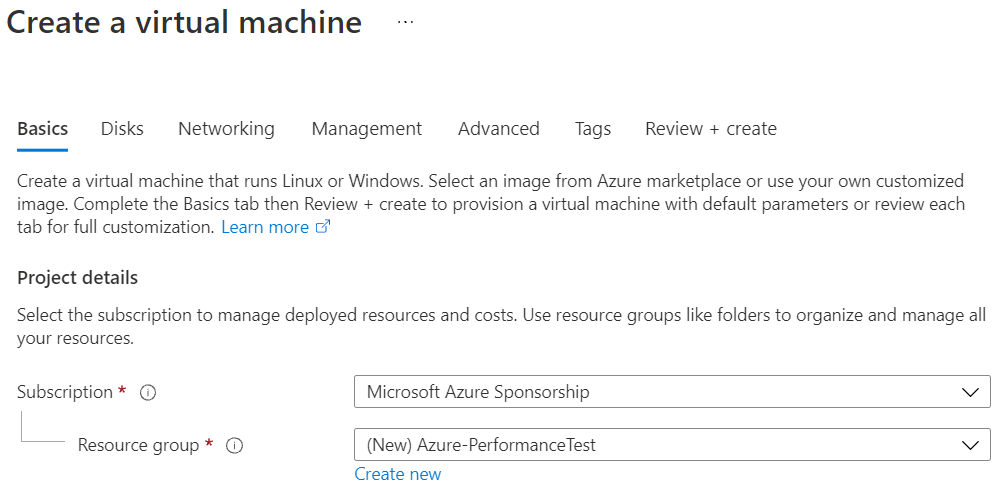
4. In the Basics tab, under Project details, make sure the correct subscription is selected and then choose to Create new resource group. Type Azure-PerformanceTest (user choice) for the name.
5. Under Instance details, type Azure-VM (user choice) for the Virtual machine name and choose West Europe for Region. Choose CentOS, Version 8.1 HPC-Gen2 for the Image and Standard_ND96asr_v4 for the Size (user choice). Leave the other defaults.
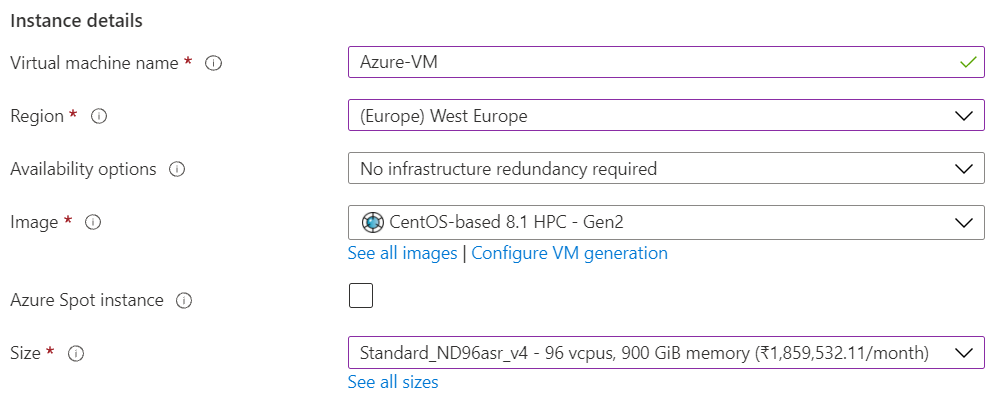
Note:
- Region must be decided based on where the Virtual machine is going to be deployed. To avoid the network latency, the region should be near to the location where the VM is to be deployed.
- Image selection is of user choice based on the application user can choose the image (Windows 10, Linux based OS and Windows Server)
6. Under Administrator account, provide a username, such as Azureuser and a password. The password must be at least 12 characters long and meet the defined complexity requirements.

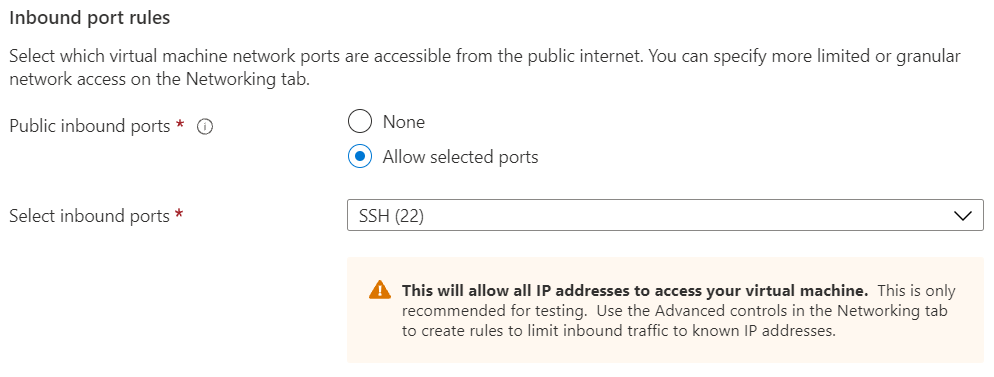
7. Under Inbound port rules, choose Allow selected ports and then select SSH (22) from the drop-down.
8. In Advanced tab, under the Extensions click Select an extension to install, select NVIDIA GPU Driver Extension (user choice)
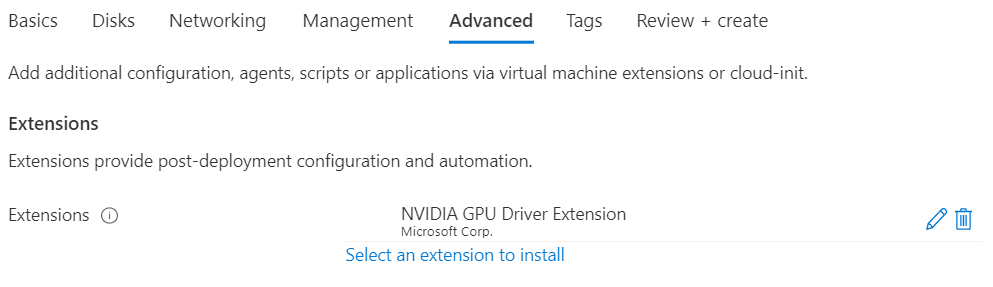
Note: This Step 8, will installs the older version of Nvidia and Cuda driver hence the user can skip this step and proceed the VM deployment without extension. Follow manual installation as per chapter 2.5.
9. Leave the remaining defaults and then select the Review + create button at the bottom of the page.
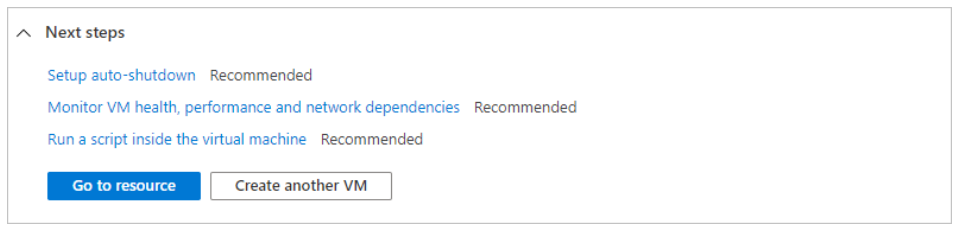
10. After validation runs, select the Create button at the bottom of the page.

11. After deployment is complete, select Go to resource.
2.4 Connect to virtual machine
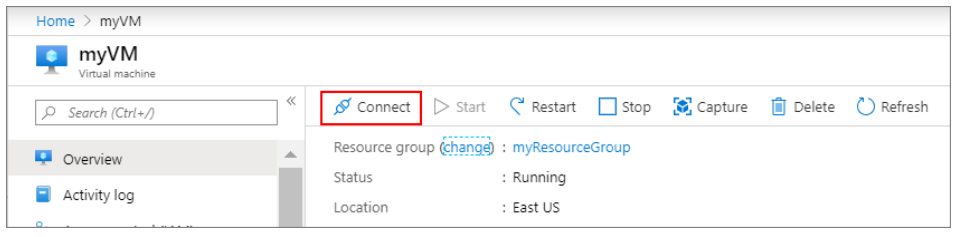
Create a SSH connection to the virtual machine.
1. On the overview page of a virtual machine, select the Connect button then select SSH and copy the public IP address.
2. Open any SSH client tool of user choice, in this case PUTTY is used.
3. Enter the IP address and port as 22 and click Open
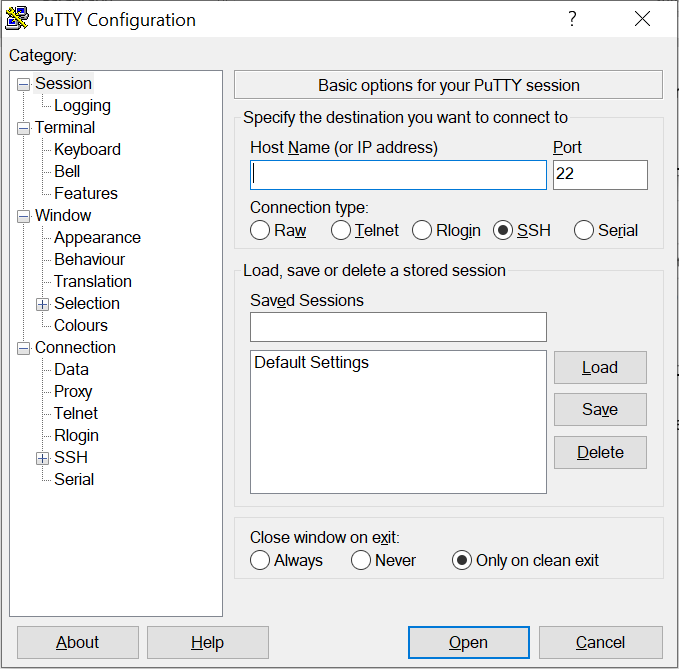
4. Enter username in Login as, enter the password, and click Enter.
5. Now user connected to the VM in Console
To take advantage of the GPU capabilities of Azure N-series VMs backed by NVIDIA GPUs, the user must install NVIDIA GPU drivers.
If the machine has a NVLink or NVSwitch connecting the GPUs like in the case of NDv4 virtual machine, one should also install the associated version of the Nvidia fabric manager.
There are two ways to install the drivers,
- The NVIDIA GPU Driver Extension installs appropriate NVIDIA CUDA or GRID drivers on an N-series VM. Install or manage the extension using the Azure portal (Ref 8)
- Install NVIDIA GPU drivers manually. (For the manual installation follow the procedure given below)
Nvidia Data Center Driver installation guide for CentOS 8
The step-by-step instruction is given below,
1. In some cases, user may need to install some additional dependencies that are required
For installing the NVIDIA drivers.
# sudo dnf install -y tar bzip2 make automake gcc gcc-c++ pciutils elfutils-libelf-devel libglvnd-devel
2. Enable the PowerTools repo and set up the external dependency on EPEL for DKMS.
# sudo dnf config-manager --set-enabled PowerTools
# sudo dnf install -y epel-release
3. Install the CUDA repository public GPG key
# Distribution=rhel8
4. Setup the CUDA network repository
# ARCH=$( /bin/arch)
# sudo dnf config-manager --add-repo http://developer.download.nvidia.com/compute/cuda/repos/$distribution/${ARCH}/cuda-$distribution.repo
5. For CentOS 8, ensure that the system has the correct Linux kernel sources from the CentOS repositories:
# sudo dnf install -y kernel-devel-$(uname -r) kernel-headers-$(uname -r)
6. Note that in some cases, user may have to update the running kernel as a pre-requisite:
# sudo dnf install -y kernel kernel-core kernel-modules
7. Update the repository cache and install the driver using the nvidia-driver meta-package
# sudo dnf clean all
# sudo dnf -y module install nvidia-driver:latest-dkms
8. Install fabric manager to activate the NVswitch (For NDv4 instance)
# sudo dnf module install nvidia-driver:latest-dkms/fm
9. Enable FM Service to Auto Start at Boot
# sudo systemctl enable nvidia-fabricmanager
Reference: https://docs.nvidia.com/datacenter/tesla/tesla-installation-notes/index.html#centos8/
3 Install Barracuda Virtual Reactor Application on Virtual Machine
Instructions on how to download Virtual Reactor products from CPFD Marketplace:
Before beginning, open CPFD Marketplace in a web browser and log on.
1. Type Virtual Reactor in the search box and press Enter.
2. Click on CPFD software: Home
3. Click on Log on to CPFD account at upper right corner.
4. For log in user need to create CPFD account.
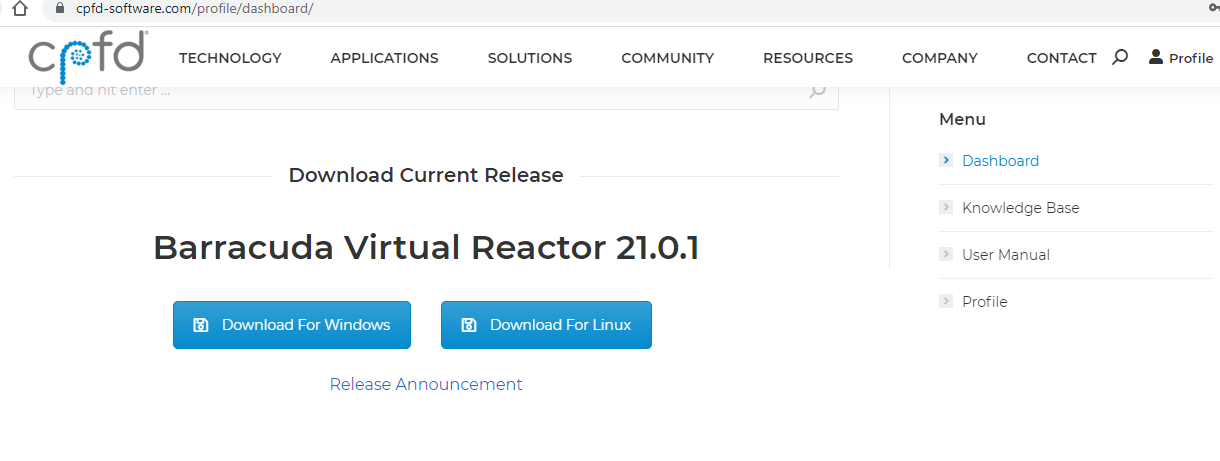
5. After log in user have dashboard panel
6. Dashboard panel contain two downloadable packages.
7. Click the Download For Linux icon.
8. That package contains one installation user guide and one run file.
3.2 Install Barracuda Virtual Reactor application on Linux
Installation instructions for Barracuda Virtual Reactor can be found in below path:
https://cpfd-software.com/user-manual/installation.html
4 Performance results of Barracuda Virtual Reactor on Azure virtual machine
4.1 Barracuda Virtual Reactor Overview
Barracuda Virtual Reactor is a computational fluid dynamics (CFD) software package developed specifically for engineering design, problem solving, and optimization of industrial-scale fluidized bed reactors (FBRs). Employing an easy-to-use Graphical User Interface (GUI), and enhanced with visualization software from Tecplot, Inc. of Bellevue, Washington, U.S.A. Virtual Reactor TM helps engineers improve the reliability, capacity, and profitability of FBRs – through efficient modelling of both non-reacting and reacting gas-particle dynamics. Leveraging low-cost, high-performance computing, Barracuda physics-based simulation technology delivers key process performance information supporting critical design and operational decisions – providing competitive advantage through improved equipment performance, lower warranty risk and rework, higher yields, lower operating costs and longer up-time
4.2 Barracuda Virtual Reactor on Azure Platform
To carry out the CFD simulations on Virtual Reactor software, right hardware with latest CPUs and GPUs are required. Microsoft partnered with Nvidia provides the required and suitable Infrastructure and hardware on Azure cloud platform. It provides the latest and fastest compute capabilities for both CPU and GPU intensive workloads.
|
Operating system and Nvidia drivers Details |
|
|
Operating system version |
CentOS Linux release 8.1.1911 (Core) |
|
OS Architecture |
X86-64 |
|
GPU Drivers version |
470.57.02 |
|
Cuda version |
11.4 |
4.3 Barracuda Virtual Reactor Performance Results
Model Details:
|
Test Problem No |
Cell count |
No. of particles |
Chemistry |
Thermal |
P1 model |
|
479 |
243267 |
29920300 |
enabled |
enabled |
disabled |
|
499 |
243267 |
3581140 |
enabled |
enabled |
disabled |
|
480 |
105157 |
40581300 |
disabled |
disabled |
disabled |
|
500 |
105157 |
9528670 |
disabled |
disabled |
disabled |
|
481 |
389320 |
50170500 |
enabled |
enabled |
disabled |
|
501 |
389320 |
12994400 |
enabled |
enabled |
disabled |
|
482 |
821781 |
55070200 |
enabled |
enabled |
disabled |
|
502 |
821781 |
22625700 |
enabled |
enabled |
disabled |
Particle-based fluid dynamics simulations are carried out on the following Virtual machine configurations.
Azure Virtual machines tested: ND96asr_v4, NC24s_v3 and NC64as_T4_v3
The simulations are carried out to see the performance of GPU and CPU on the chosen Azure Virtual Machine Configuration. Refer chapter 2.2 for the VM specifications.
The results are presented below,
Elapsed time for NDV4 Virtual Machine - (“Seconds”)
|
Test Problem NO. |
479 |
480 |
481 |
482 |
499 |
500 |
501 |
502 |
|
CPU |
422.55 |
755.8 |
755.8 |
1258.1 |
92.92 |
222.81 |
594.3 |
601.59 |
|
1-GPU |
2.92 |
12.7 |
12.7 |
13.8 |
1.453 |
2.63 |
9.57 |
6.59 |
|
2-GPU |
2.85 |
7.4 |
7.4 |
7.4 |
1.358 |
1.8 |
6.38 |
4.57 |
|
3-GPU |
2.68 |
5.4 |
5.4 |
6.1 |
1.629 |
1.61 |
5.65 |
4.49 |
|
4-GPU |
3.35 |
4.6 |
4.6 |
7.8 |
1.845 |
1.71 |
5.41 |
4.44 |
|
5-GPU |
3.35 |
4.5 |
4.5 |
8 |
2.189 |
1.83 |
5.86 |
5.39 |
|
6-GPU |
3.67 |
4.8 |
4.8 |
8 |
2.908 |
2.36 |
6.21 |
6.46 |
|
7-GPU |
4.17 |
4.6 |
4.6 |
9.6 |
3.433 |
2.69 |
8.56 |
6.63 |
|
8-GPU |
4.62 |
4.6 |
4.6 |
9 |
3.971 |
3.01 |
8.12 |
7.93 |
Elapsed time for NCV3 Virtual Machine - (“Seconds”)
|
Test Problem NO. |
479 |
480 |
481 |
482 |
499 |
500 |
501 |
502 |
|
CPU |
595.68 |
1146.1 |
5327.5 |
1768.7 |
113.751 |
335.73 |
772.93 |
678.59 |
|
1-GPU |
8.8 |
55 |
216.3 |
183.2 |
2.17 |
5.19 |
17.2 |
12.88 |
|
2-GPU |
8.03 |
12.5 |
49.9 |
22.7 |
5.217 |
5.2 |
24.37 |
13.8 |
|
3-GPU |
8.06 |
10.1 |
46 |
20.8 |
5.708 |
4.31 |
29.68 |
12.88 |
|
4-GPU |
8.07 |
9.5 |
67.1 |
19.1 |
6.61 |
4.84 |
35.98 |
13.93 |
Elapsed time for NCas-T4 Virtual Machine - (“Seconds”)
|
Test Problem NO. |
479 |
480 |
481 |
482 |
499 |
500 |
501 |
502 |
|
CPU |
439.31 |
789.6 |
1673.1 |
1266.5 |
96.427 |
251.59 |
609.31 |
609.34 |
|
1-GPU |
28.31 |
87.1 |
295.1 |
238 |
6.37 |
9.9 |
49.15 |
39.5 |
|
2-GPU |
16.82 |
29.9 |
163.6 |
50.7 |
7.271 |
7.95 |
87.51 |
27.47 |
|
3-GPU |
14.17 |
21.7 |
258.2 |
45.2 |
7.47 |
7.72 |
127.32 |
24.21 |
|
4-GPU |
12.73 |
18 |
351.1 |
35.4 |
8.025 |
7.72 |
128.35 |
22.34 |
Simulation speed-up for NDV4 Virtual Machine - (“Seconds/Day”)
|
Test Problem NO. |
479 |
480 |
481 |
482 |
499 |
500 |
501 |
502 |
|
CPU |
1.84 |
1.03 |
0.49 |
0.62 |
7.44 |
3.49 |
1.31 |
1.29 |
|
1-GPU |
172.10 |
61.10 |
29.37 |
56.11 |
475.84 |
295.82 |
81.31 |
118.05 |
|
2-GPU |
266.81 |
104.80 |
52.80 |
96.60 |
509.10 |
433.26 |
81.31 |
170.29 |
|
3-GPU |
272.85 |
145.75 |
68.53 |
105.11 |
424.87 |
482.75 |
137.87 |
173.19 |
|
4-GPU |
290.68 |
168.87 |
75.92 |
126.11 |
375.23 |
454.95 |
144.20 |
175.39 |
|
5-GPU |
232.16 |
162.10 |
77.81 |
99.79 |
316.32 |
426.85 |
132.83 |
144.44 |
|
6-GPU |
211.66 |
172.31 |
79.69 |
96.47 |
238.60 |
329.83 |
125.22 |
120.73 |
|
7-GPU |
186.82 |
163.73 |
71.68 |
81.18 |
201.66 |
289.21 |
101.61 |
117.47 |
|
8-GPU |
168.21 |
171.39 |
78.23 |
85.89 |
174.89 |
258.41 |
96.02 |
98.20 |
Simulation speed-up for NCV3 Virtual Machine - (“Seconds/Day”)
|
Test Problem NO. |
479 |
480 |
481 |
482 |
499 |
500 |
501 |
502 |
|
CPU |
1.31 |
0.68 |
0.24 |
0.44 |
6.08 |
2.32 |
1.01 |
1.15 |
|
1-GPU |
91.28 |
14.14 |
3.60 |
4.25 |
317.20 |
149.69 |
45.20 |
60.38 |
|
2-GPU |
96.82 |
61.91 |
17.18 |
34.33 |
132.88 |
149.65 |
32.40 |
56.41 |
|
3-GPU |
96.62 |
76.89 |
18.84 |
37.51 |
122.35 |
180.74 |
27.03 |
60.45 |
|
4-GPU |
96.45 |
82.22 |
12.13 |
40.68 |
105.15 |
160.74 |
24.38 |
55.87 |
Simulation speed-up for NCas-T4 Virtual Machine - (“Seconds/Day”)
|
479 |
480 |
481 |
482 |
499 |
500 |
501 |
502 |
|
|
CPU |
1.77 |
0.98 |
0.47 |
0.61 |
7.17 |
3.09 |
1.28 |
1.28 |
|
1-GPU |
27.50 |
8.93 |
2.64 |
3.27 |
108.69 |
52.73 |
15.82 |
19.69 |
|
2-GPU |
46.23 |
26.00 |
5.08 |
15.32 |
95.26 |
78.55 |
9.19 |
28.30 |
|
3-GPU |
54.90 |
35.83 |
17.21 |
17.21 |
92.92 |
97.88 |
6.12 |
32.16 |
|
4-GPU |
61.07 |
43.13 |
21.95 |
21.95 |
86.39 |
100.70 |
6.07 |
34.86 |
Simulation Speed-up Charts for NDV4 Virtual Machine
The below chart shows the performance of two similar models with difference in particle count,
Simulation Speedup charts for NCV3 Virtual Machine
The below chart shows the performance of two similar models with difference in particle count,
Simulation Speedup Charts for NCas-T4 Virtual Machine
The below chart shows the performance of two similar models with difference in particle count,
For the below cost reports, the application installation time is not considered and only wall clock time is considered for the cost calculation. The Hourly rates reported are subject to change. For the current rate please refer the link “https://azure.microsoft.com/en-in/pricing/calculator/”.
|
Azure VM Size |
CPU&GPU |
Elapsed Time in Hours |
Azure VM Hourly Cost |
Total Azure Cost |
|
ND96asr_v4 |
CPU |
1.31 |
$39.77 |
$51.96 |
|
1-GPU |
0.02 |
$39.77 |
$0.69 |
|
|
2-GPU |
0.01 |
$39.77 |
$0.43 |
|
|
3-GPU |
0.01 |
$39.77 |
$0.36 |
|
|
4-GPU |
0.01 |
$39.77 |
$0.37 |
|
|
5-GPU |
0.01 |
$39.77 |
$0.39 |
|
|
6-GPU |
0.01 |
$39.77 |
$0.43 |
|
|
7-GPU |
0.01 |
$39.77 |
$0.49 |
|
|
8-GPU |
0.01 |
$39.77 |
$0.51 |
|
CPU&GPU |
Elapsed Time in Hours |
Azure VM Hourly Cost |
Total Azure Cost |
|
|
NC24s_v3 |
CPU |
2.98 |
$16.41 |
$48.96 |
|
1-GPU |
0.14 |
$16.41 |
$2.28 |
|
|
2-GPU |
0.04 |
$16.41 |
$0.65 |
|
|
3-GPU |
0.04 |
$16.41 |
$0.63 |
|
|
4-GPU |
0.05 |
$16.41 |
$0.75 |
|
Azure VM Size |
CPU&GPU |
Elapsed Time in Hours |
Azure VM Hourly Cost |
Total Azure Cost |
|
NC64as_T4_v3 |
CPU |
1.59 |
$5.48 |
$8.73 |
|
1-GPU |
0.21 |
$5.48 |
$1.15 |
|
|
2-GPU |
0.11 |
$5.48 |
$0.60 |
|
|
3-GPU |
0.14 |
$5.48 |
$0.77 |
|
|
4-GPU |
0.16 |
$5.48 |
$0.89 |
Note: The Elapsed time for full production-level test cases will be on the higher side than the results presented here and hence, the associated cost will increase.
1. Virtual Reactor is successfully tested on NDV4, NCv3 and NCas-T4 Virtual Machines on Azure Cloud Platform
2. For NDv4 Virtual Machine, we can see that the application is scaling well up to 4 GPUs for the models with larger particle counts and for the models with lesser particle counts, it is scaling only up to 2 GPUs.
3. For NCv3 Virtual Machine, we can see performance improvement up to 3 GPUs for the models with larger particle counts and for models with smaller particle count, only 1 GPU configuration is recommended
4. For NCas-T4 Virtual Machine, the application is speed-up well with all the 4 GPUs for models with larger particle count and for the models with lesser particle count, it is scaling well only with 1 GPU configuration.
5. For simulations with large numbers of particles and cells, a single 16 GB GPU may not be sufficient to run well due to the memory requirements. In these cases, running the simulation with two GPUs is critical. This is seen in test problems 480, 481, and 482 on the NCV3 and NCAS T4 machines
6. For smaller simulations where there are performance penalties when utilizing all GPUs on an instance, concurrent simulations can be run using the other GPUs. In this scenario, multiple points in the simulation parameter space could be explored more quickly.
2 Deploy Virtual Machine on Azure Cloud Platform
2.1 Azure Cloud Architecture for Application
2.2 Azure Virtual Machine (VM)
2.3 Create a Virtual Machine on Azure Platform
2.4 Connect to virtual machine
3 Install Barracuda Virtual Reactor Application on Virtual Machine
3.2 Install Barracuda Virtual Reactor application on Linux
4 Performance results of Barracuda Virtual Reactor on Azure virtual machine
4.1 Barracuda Virtual Reactor Overview
4.2 Barracuda Virtual Reactor on Azure Platform