

Azure HPC Recipe Document for Gromacs
1. Introduction
This document briefly explains the steps to install and run Gromacs application on a Virtual Machine deployed in Azure Cloud Platform and presents the performance results.
This recipe document covers the following topics: -
- Deploy & connect a required virtual machine on Azure platform.
- Install Application on virtual machine.
- Install license manager for current application
- Performance results of current application on azure virtual machine
- Azure consumption
- Summary
2. Deploy Virtual Machine on Azure Cloud Platform
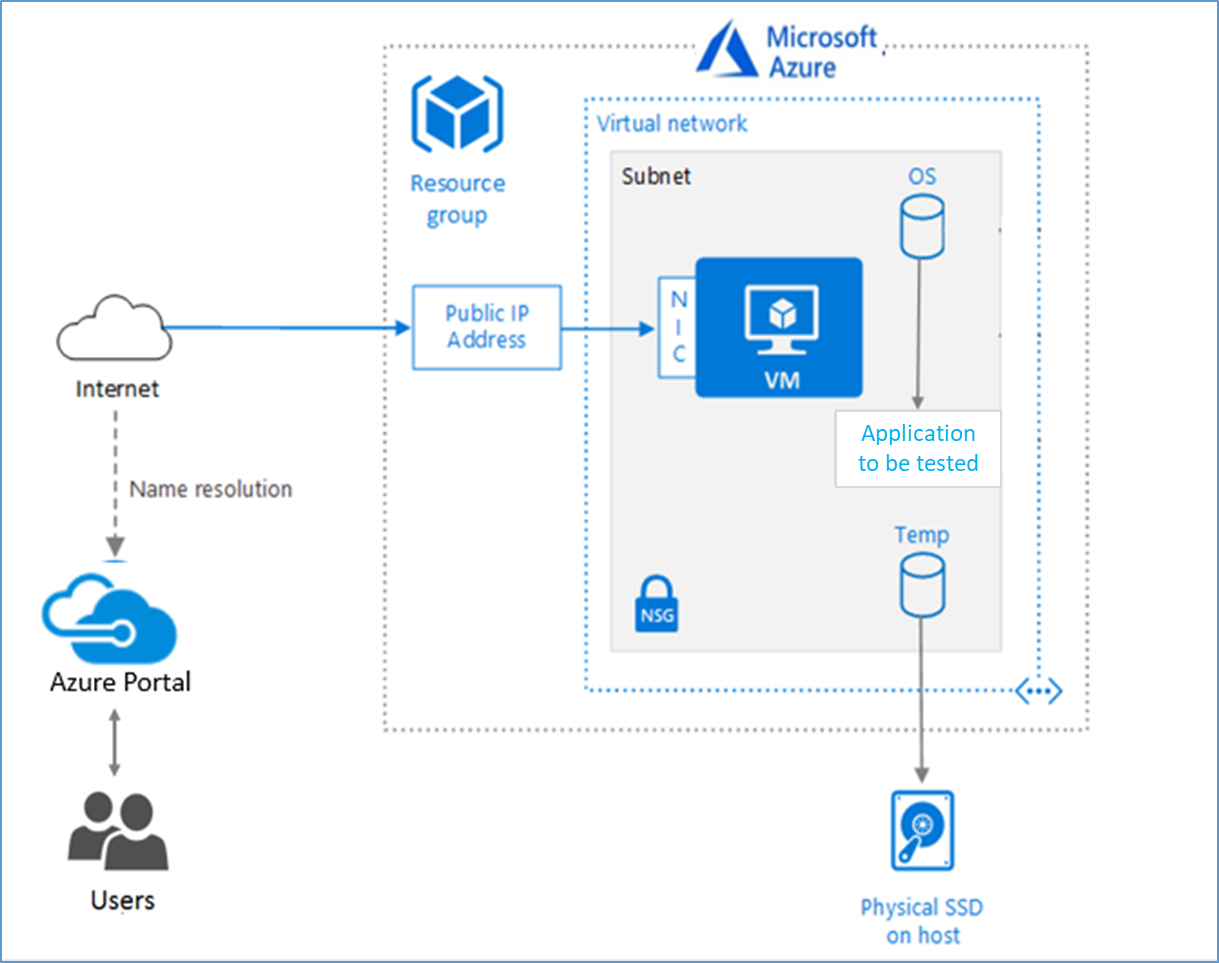
2.1 Azure Cloud Architecture for Application
The below Architecture explains the virtual machine running on an Azure Platform
2.2 Azure Virtual Machine (VM)
A VM is a virtualized instance of a computer that can perform almost all the same functions as a computer, including running applications and operating systems.
An Azure VM gives the flexibility of virtualization without having to buy and maintain the physical hardware that runs it. However, the user still needs to maintain the VM by performing tasks, such as configuring, patching, and installing the software that runs on it.
Things to be considered before deploying a VM,
- The names of the application resources
- The location where the resources are stored
- The size of the VM
- The operating system that the VM runs
- The configuration of the VM
- The related resources that the VM needs
There are different sizes and options available for the Azure virtual machines and user can use to run apps and workloads. Depending on the workload user must choose the appropriate VM size. For complete list check this https://docs.microsoft.com/en-us/azure/virtual-machines/sizes/.
To test the performance of Gromacs on Azure Platform, HBv3-series virtual machine is deployed.
|
Size |
vCPU |
RAM Memory: GiB |
Memory bandwidth GB/s |
Base CPU frequency (GHz) |
All-cores frequency (GHz, peak) |
Single-core frequency (GHz, peak) |
RDMA performance (Gb/s) |
Max data disks |
|
Standard_HB120rs_v3 |
120 |
448 |
350 |
2.45 |
3.1 |
3.675 |
200 |
32 |
|
Standard_HB96rs_v3 |
96 |
448 |
350 |
2.45 |
3.1 |
3.675 |
200 |
32 |
|
Standard_HB64rs_v3 |
64 |
448 |
350 |
2.45 |
3.1 |
3.675 |
200 |
32 |
|
Standard_HB32rs_v3 |
32 |
448 |
350 |
2.45 |
3.1 |
3.675 |
200 |
32 |
|
Standard_HB16rs_v3 |
16 |
448 |
350 |
2.45 |
3.1 |
3.675 |
200 |
32 |
The current virtual machine HBv3-series VMs are optimized for HPC applications such as fluid dynamics, explicit and implicit finite element analysis, weather modelling, seismic processing, reservoir simulation, and RTL simulation. HBv3 VMs feature up to 120 AMD EPYC™ 7003-series (Milan) CPU cores, 448 GB of RAM, and no hyper-threading. HBv3-series VMs also provide 350 GB/sec of memory bandwidth; up to 32 MB of L3 cache per core, up to 7 GB/s of block device SSD performance, and clock frequencies up to 3.675 GHz.
2.3 Create a Virtual Machine on Azure Platform
Sign into Azure
Sign into the Azure portal by using https://portal.azure.com/
Free Trial subscriptionsaren't eligible for limit or quota increases.
After the successful sign in or sign up, one has to upgrade the Azure subscription to Pay-As-You-Go to deploy a Virtual machine. For deployment, the user must have regional vCPU quota which can be obtained by raising a request.
The step-by-step procedure to increase the vCPU quota is given below,
https://docs.microsoft.com/en-us/azure/azure-portal/supportability/per-vm-quota-requestsThe step-by-step procedure to deploy Virtual machine is given below,
- Type virtual machines in the marketplace search.
- Under Services, select Virtual machines.
- In the Virtual machines page, select Create Then Virtual machine.
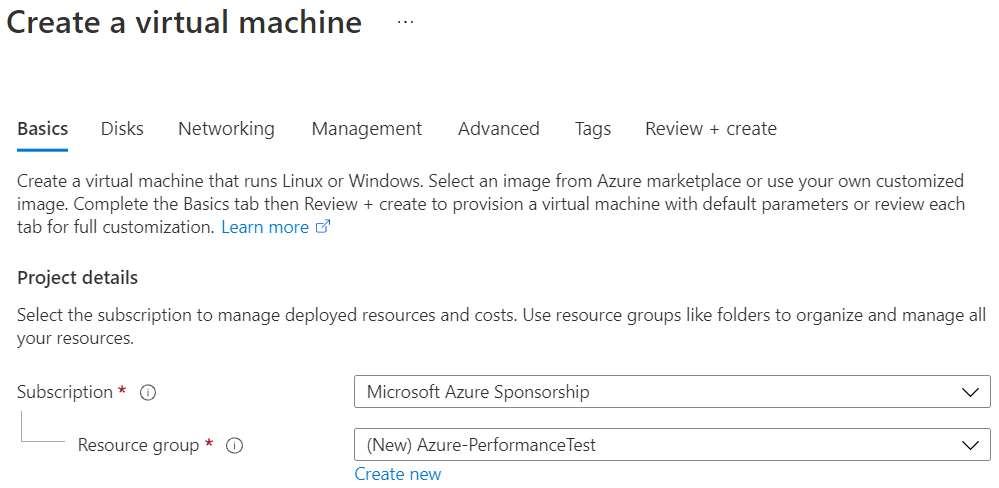
- In the Basics tab, under Project details, make sure the correct subscription is selected and then choose to Create new resource group. Type Azure-PerformanceTest(user choice) for the name.
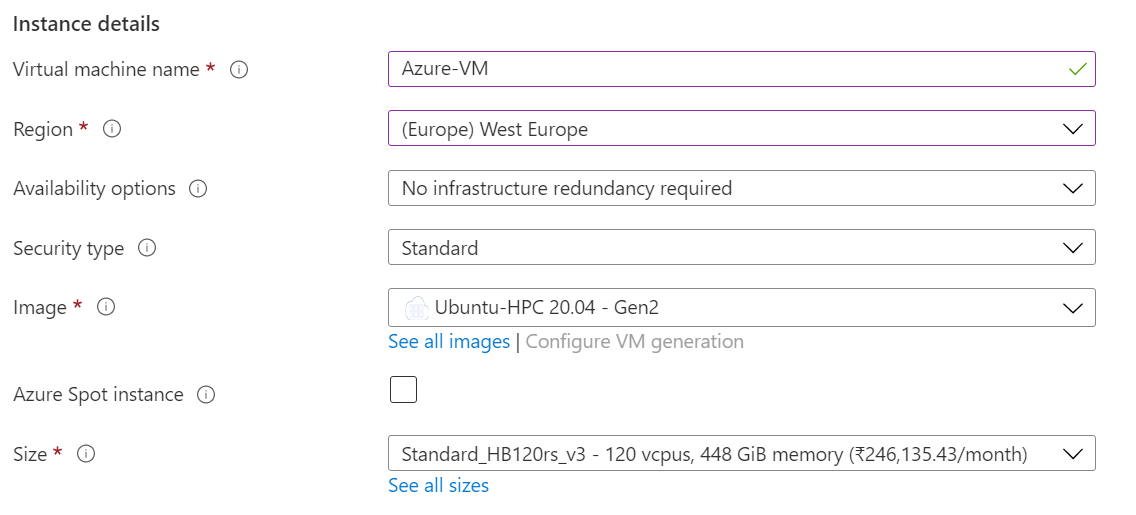
- Under Instance details, type Azure-VM (user choice) for the Virtual machine name and choose West Europe for Region. Choose Ubuntu, Version 20.04 HPC-Gen2 for the Image and Standard_HB120rs_v3 for the Size (user choice). Leave the other defaults.
Note:
- Region must be decided based on where the Virtual machine is going to be deployed. To avoid the network latency, the region should be near to the location where the VM is to be deployed.
- Image selection is of user choice based on the application user can choose the image (Windows 10, Linux based OS and Windows Server)
- Under Administrator account, provide a username, such as Azureuser and a password. The password must be at least 12 characters long and meet the defined complexity requirements.

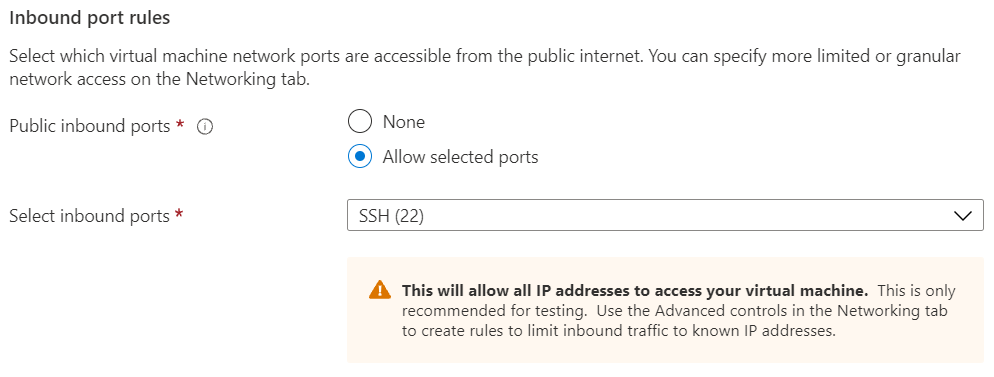
- Under Inbound port rules, choose Allow selected ports and then select SSH (22) from the drop-down.
- In Advanced tab, under the Extensions click Select an extension to install (depends on user requirement)
- Leave the remaining defaults and then select the Review + create button at the bottom of the page.
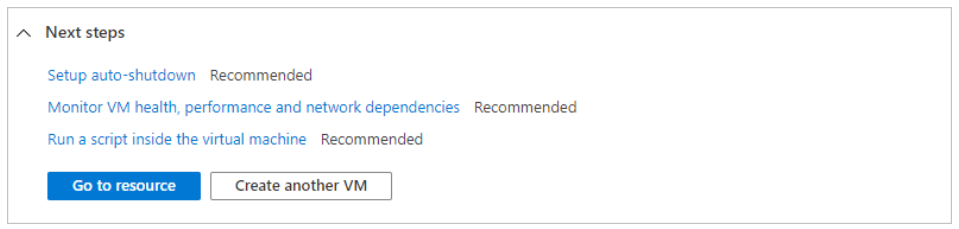
- After validation runs, select the Create button at the bottom of the page.

- After deployment is complete, select Go to resource.
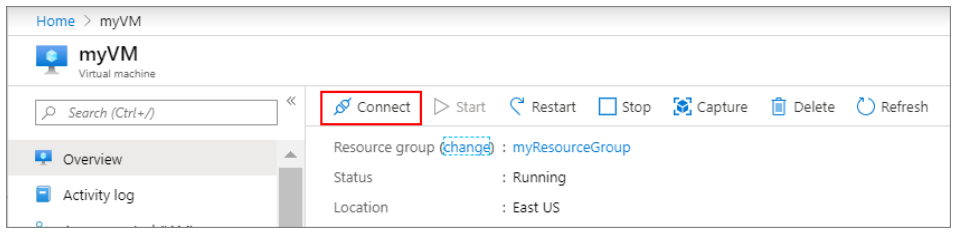
2.4 Connect to virtual machine
Create a SSH connection to the virtual machine.
- On the overview page of a virtual machine, select the Connect button then select SSH and copy the public IP address.
- Open any SSH client tool of user choice, in this case PUTTY is used.
- Enter the IP address and port as 22 and click Open
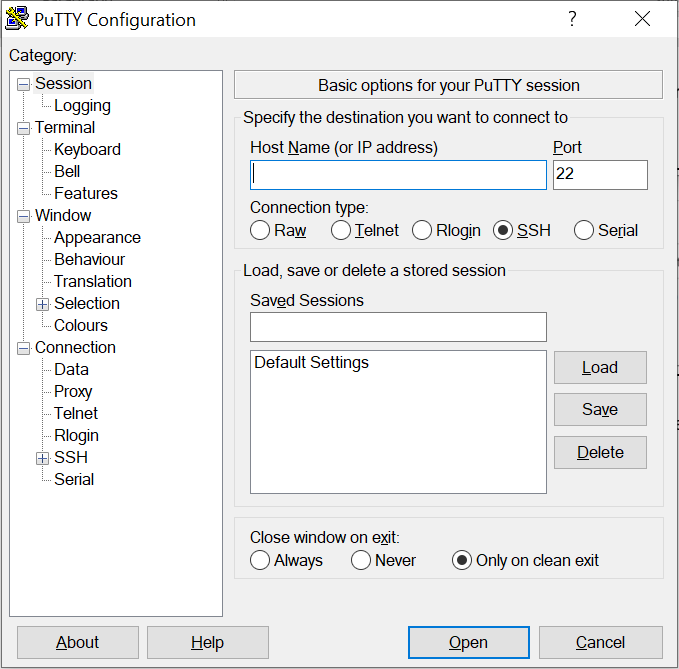
- Enter username in Login as and enter the password and click Enter.
- Now user connected to the VM in Console
3. Install Gromacs Application on Virtual Machine in Spack Environment
3.1. Install the required compilers
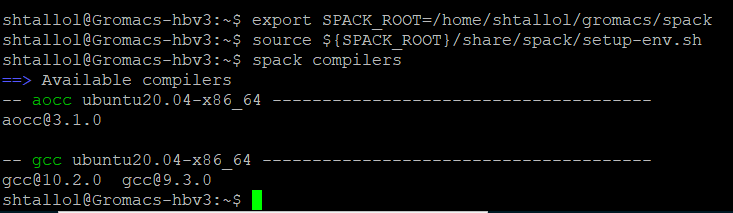
Before initiating the Gromacs installation in Spack environment, open the Putty session and log in to the VM where we intend to install Gromacs and execute the following commands.
1) sudo apt update Thesudo apt-get updatecommand is used to download package information from all configured sources. So, when you run update command, it downloads the package information from the Internet. It is useful to get info on an updated version of packages or their dependencies.
2) sudo apt upgrade will fetch new versions of packages existing on the machine.
3) sudo apt install gcc The followinglinux commandwill installgcccompiler.
4) sudo apt install build-essential The build-essentials packages are meta-packages that are necessary for compiling software. They include the GNU debugger, g++/GNU compiler collection, and some more tools and libraries that are required to compile a program. For example, if you need to work on a C/C++ compiler, you need to install essential meta-packages on your system before starting the C compiler installation. When installing the build-essential packages, some other packages such as G++, dpkg-dev, GCC and make, etc. also install on your system.
3.2. Setting up Spack
1) Install Spack into SPACK_ROOT director
export SPACK_ROOT=/path/to/spack
2) Get Spack
git clone https://github.com/spack/spack.git $SPACK_ROOT
3) Add following lines to. bashrc or. profile file to set the paths
export SPACK_ROOT=/path/to/spack ${SPACK_ROOT}/share/spack/setup-env.sh
4) To list available compilers use the below command
spack compilers
5) To Install gcc@10.2.0 compiler
spack install gcc@10.2.0
6) To add gcc@10.2.0to the list of compilers
spack cd -i gcc@10.2.0
spack compiler add $PWD
7) To Install aocc@3.1.0 compiler
spack install aocc@3.1.0 or spack install aocc +license-agreed
8) To add aocc3.1.0to the list of compilers
spack cd -i aocc@3.1.0
spack compiler add $PWD
9) After Installing the gcc10.2.0 and aocc3.1.0 reverify that the compilers are installed and added to the list.
To list available compilers
spack compilers

3.3. Installation and Loading Gromacs module
Please follow the instruction as given below:
1) For building GROMACS 2021.2 with AOCC-3.1.0 AOCL-3.0 and Open MPI-4.0.5
spack -dinstall-vgromacs@2021.2 %aocc@3.1.0 target=zen3 +blas +lapack ^amdlibflame@3.0 ^amdblis@3.0 ^amdfftw@3.0 ^openmpi@4.0.5
2) Loading Gromacs build with AOCC
spack load gromacs@2021.2 %aocc@3.1.0
3.4. Gromacs run Execution
For executing run of “water_GMX50_bare model” please follow below steps.
1) Get the model from the Gromacs model library by using the command below.
wget http://ftp.gromacs.org/pub/benchmarks/water_GMX50_bare.tar.gz
2) Untar the downloaded file by using the below command
tar -xvf water_GMX50_bare.tar.gz
3) Change the directory to the model location.
cd water-cut1.0_GMX50_bare/3072
4) To generate the. tpr input file
- To get installed folder path:- spack cd -i gromacs@2021.2 %aocc@3.1.0
- exportGMX=/<gromacs_installed_path>/bin/gmx_mpi
- $GMX grompp -f pme.mdp -c conf.gro -p topol.top-o water_pme.tpr
3.5. Run Command using Open MPI
For running model in Gromac application after creation of. tpr file, please use below mentioned script:
mpirun --bind-to core --map-by hwthread -use-hwthread-cpus -np 256 -mca btl vader,self $GMX mdrun -notunepme -dlbyes-v-resethway -noconfout -nsteps 4000 -s water_pme.tpr
3.6. Steps to follow for executing the Gromacs run
After setting all environment of Linux machine for Gromacs application below are the steps we have to follow every time whenever we will execute the run for the models.
1) export SPACK_ROOT=/home/shtallol/gromacs/spack
2) source ${SPACK_ROOT}/share/spack/setup-env.sh
3) spack load gromacs@2021.2 %aocc@3.1.0
4) spack cd -i gromacs@2021.2 %aocc@3.1.0
5) export GMX=/home/shtallol/gromacs/spack/opt/spack/linux-ubuntu20.04-zen3/aocc-3.1.0/gromacs-2021.2-khzdlqux5qwqf7osmg446vy62udni42e/bin/gmx_mpi
6) $GMX grompp -f xxx.mdp -c xxx1.gro -p xxx2.top -o yyy.tpr
7) mpirun --bind-to core --map-by hwthread -use-hwthread-cpus -np 120 -mca btl vader,self $GMX mdrun -notunepme -dlb yes -v -resethway -noconfout -nsteps 4000 -s yyy.tpr
Note : Here, xxx1, xxx2 Input file name , yyy output file name
4. Performance results of Gromacs on Azure Virtual Machines
4.1. Overview
GROMACS is a versatile package to perform molecular dynamics, i.e. simulate the Newtonian equations of motion for systems with hundreds to millions of particles. It is primarily designed for biochemical molecules like proteins, lipids and nucleic acids that have a lot of complicated bonded interactions, but since GROMACS is extremely fast at calculating the nonbonded interactions.
GROMACS providesextremely high performancecompared to all other programs.
GROMACS is user-friendly, with topologies and parameter files written in clear text format. There is a lot of consistency checking, and clear error messages are issued when something is wrong. Both run input files and trajectories are independent of hardware endian-ness, and can thus be read by any version GROMACS, even if it was compiled using a different floating-point precision. GROMACS contains several state-of-the-art algorithms that make it possible to extend the time steps is simulations significantly, and thereby further enhance performance without sacrificing accuracy or detail.
Many groups are also using it for research on non-biological systems, e.g. polymers.
4.2. Model Details
- “Cell” and “water” model is used to test Gromacs on azure platform.
- Tests are performed with different models on different CPU core virtual machine
4.3. Gromacs Performance on Azure Platform
When it comes to performance parameters for Gromacs Applications, Computation time or elapsed time is one of parameter which needs to be analysed. Gromacs is tested on Azure HBv3 Virtual Machine. The HBv3 VMs feature up to 120 AMD EPYC™ 7003-series (Milan) CPU cores, 448 GB of RAM, and no Hyper-threading. For this Benchmarking exercise of Gromacs, we have used Linux platform with Azure HPC Market-place Image (Ubuntu-based 20.04 HPC –Gen2)
|
Operating system Details |
|
|
Operating system version |
Ubuntu Linux 20.04 |
|
OS Architecture |
X86-64 |
4.4 Performance Results
For this case, the simulations are run by altering the number of processors or CPUs and the total elapsed time is calculated for each run. This performance evaluation is carried out on five different variants of HBv3 Series Virtual Machines for below models.
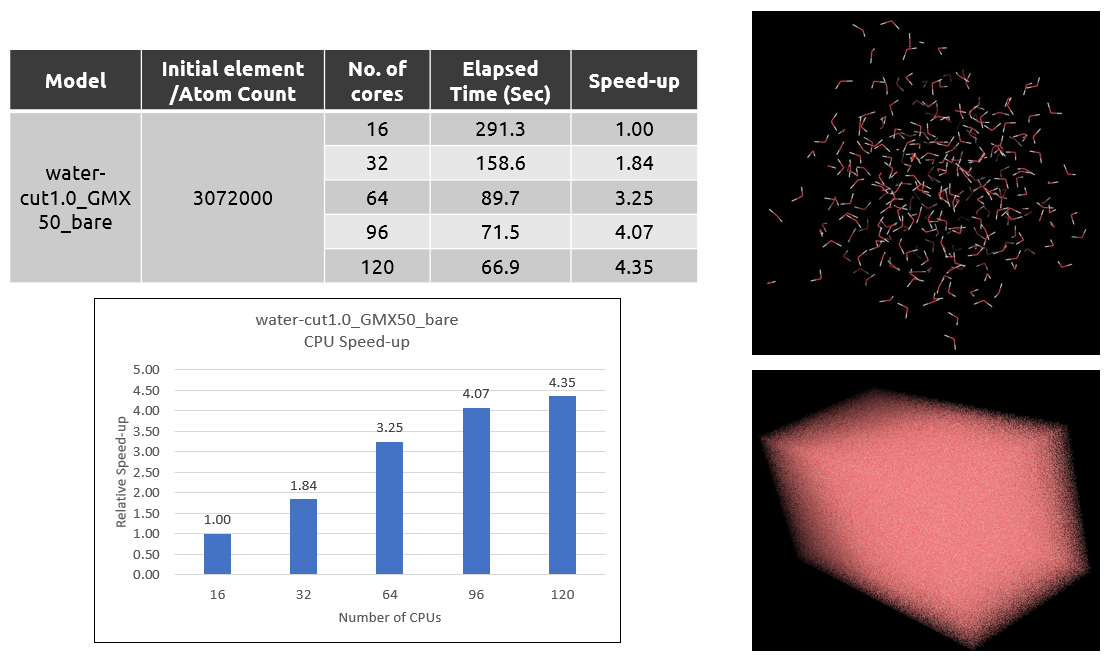
1. water-cut1.0_GMX50_bare:
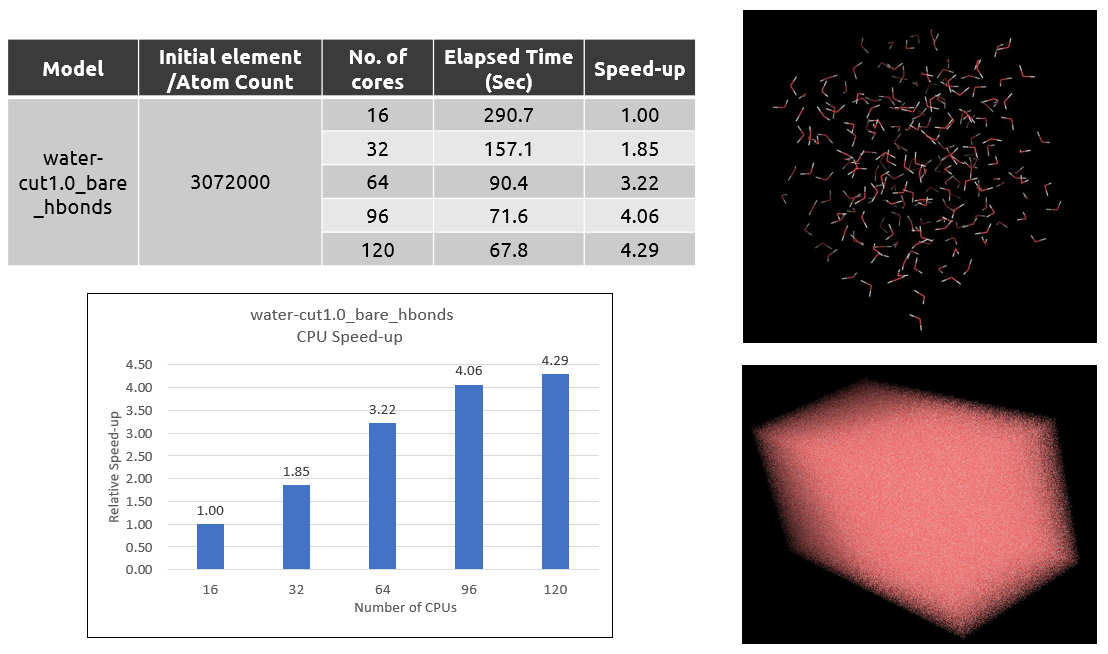
2. water-cut1.0_bare_hbonds:
3. rnase_bench_systems_old-allbond:
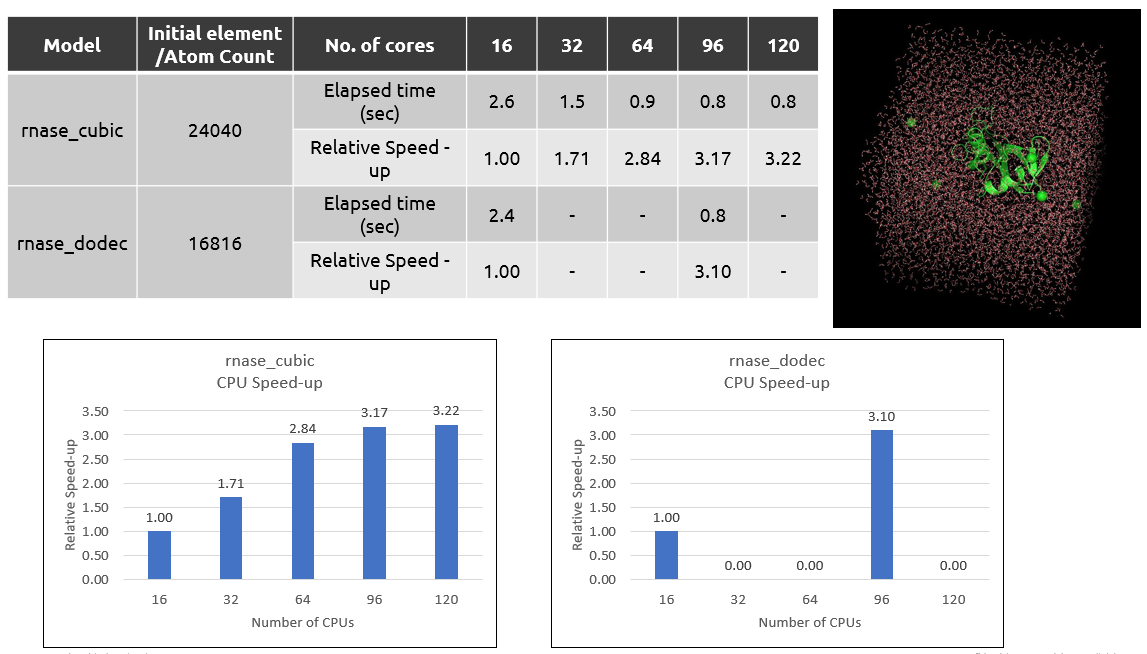
Note: rnase_dodec model can’t run on 32, 64 & 120 cores because of size of model and MPI error.
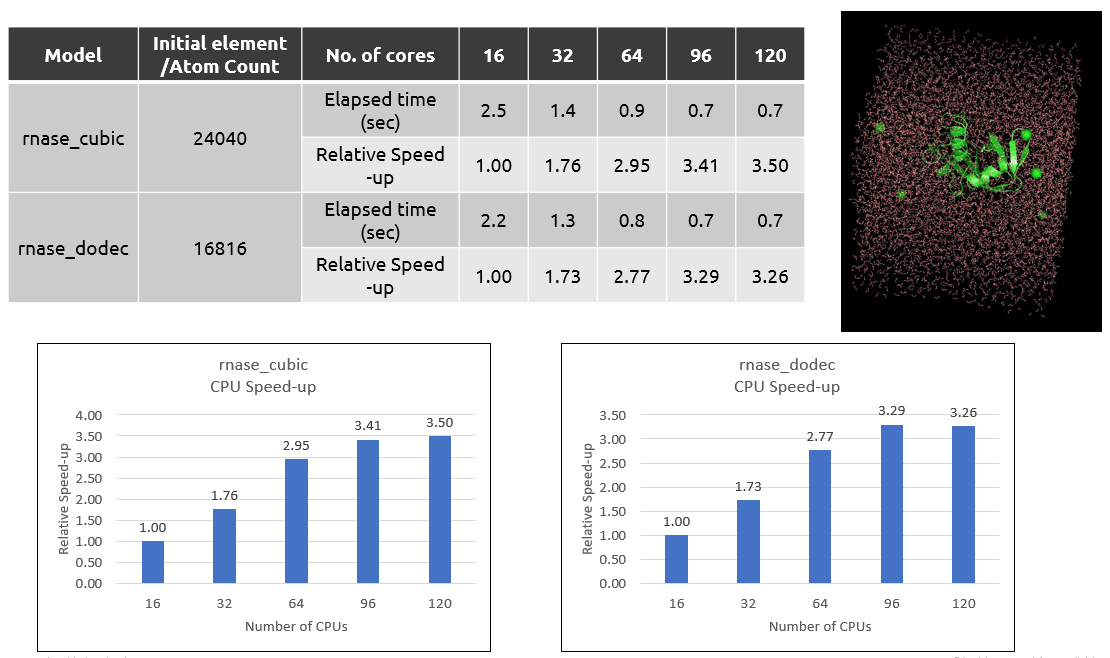
4. rnase_bench_systems:
5. gmxbench-3.0:
6. ADH_bench_systems_old-allbonds:
7.ADH_bench_systems:
5 Azure Cost Details
For the below cost reports, the application installation time is not considered and only wall clock time is considered for the cost calculation. The Hourly rates reported are subject to change. For the current rate please refer the link https://azure.microsoft.com/en-in/pricing/calculator/
|
Azure VM Name |
# CPUs |
Elapsed time in Hours |
Azure VM Hourly Cost |
Total Azure cost |
|
Standard_HB_v3 |
16 |
0.178 |
$4.68 |
$0.83 |
|
32 |
0.097 |
$4.68 |
$0.45 |
|
|
64 |
0.055 |
$4.68 |
$0.26 |
|
|
96 |
0.044 |
$4.68 |
$0.21 |
|
|
120 |
0.041 |
$4.68 |
$0.19 |
6 Summary
- Gromacs is tested successfully on the Azure Standard_HB_v3 Virtual Machine.
- We can observe a performance speedup up to 3 to 4 times with 120 vCPUs on Standard_HB120rs_v3 when we take the 16 CPUs run wall clock time as base time.
2 Deploy Virtual Machine on Azure Cloud Platform
2.1 Azure Cloud Architecture for Application
2.2 Azure Virtual Machine (VM)
2.3 Create a Virtual Machine on Azure Platform
2.4 Connect to virtual machine
3.Install Gromacs Application on Virtual Machine in Spack Environment
3.1 Install the required compilers
3.3 Installation and Loading Gromacs module
3.5 Run Command using Open MPI
3.6 Steps to follow for executing the Gromacs run
4.Performance results of Gromacs on Azure Virtual Machines