

Azure HPC Recipe Document for Turbostream
1 Introduction
This document briefly explains the steps to install and run the Turbostream application on a Virtual Machine deployed in Azure Cloud Platform and presents the performance results.
This recipe document covers the following topics: -
- Deploy & connect a required virtual machine on the Azure platform.
- Install required NVIDIA drivers in a virtual machine.
- Install Application on a virtual machine.
- Install license manager for the current application
- Performance results of current application on an Azure virtual machine
- Azure consumption
- Summary
2 Deploy Virtual Machine on Azure Cloud Platform
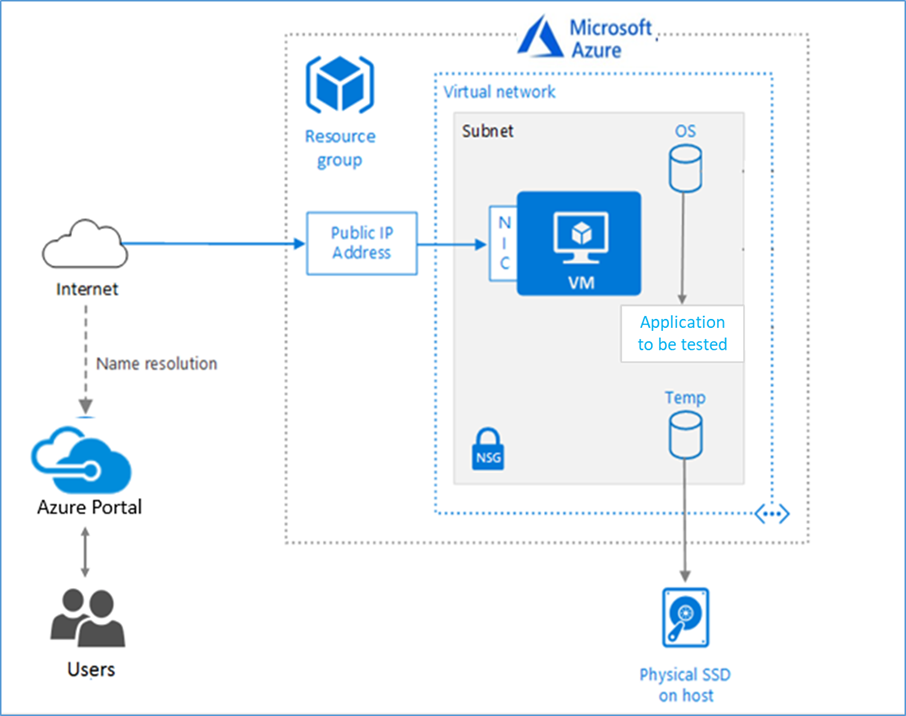
2.1 Azure Cloud Architecture for Application
The below Architecture explains the virtual machine running on an Azure Platform
2.2 Azure Virtual Machine (VM)
A VM is a virtualized instance of a computer that can perform almost all the same functions as a computer, including running applications and operating systems.
An Azure VM gives the flexibility of virtualization without having to buy and maintain the physical hardware that runs it. However, the user still needs to maintain the VM by performing tasks, such as configuring, patching, and installing the software that runs on it.
Things to be considered before deploying a VM,
- The names of the application resources
- The location where the resources are stored
- The size of the VM
- The operating system that the VM runs
- The configuration of the VM
- The related resources that the VM needs
There are different sizes and options available for the Azure virtual machines and users can use them to run apps and workloads. Depending on the workload user must choose the appropriate VM size. For the complete list, check this https://docs.microsoft.com/en-us/azure/virtual-machines/sizes/.
To test the performance of Turbostream on Azure Platform, NDv4 A100, the virtual machine is deployed.
|
VM Name |
vCPU |
Memory (GiB) |
SSD (GiB) |
GPU |
GPU Memory (GiB) |
Max Data Disk |
|
Standard_ND96asr_v4 |
96 |
900 |
2000 |
8 A100 |
40 |
32 |
- Standard_ND96asr_v4: This VMs is powered by NVIDIA Ampere A100 Tensor Core GPUs and 96 physical 2nd-generation AMD Epyc™ CPU cores (2.44GHz). The “ND96asr_v4” VM has 8 GPUs with 40 GB of memory each and is supported by 96 AMD processor cores with a total memory of 900GB. Each GPU features NVLINK 3.0 connectivity for communication within the VM.
2.3 Create a Virtual Machine on Azure Platform
Sign into Azure
Sign into the Azure portal by using https://portal.azure.com/
Free Trial subscriptionsare not eligible for limit or quota increases.
After the successful sign-in or sign-up, one has to upgrade the Azure subscription to Pay-As-You-Go to deploy a Virtual machine. For deployment, the user must have a regional vCPU quota, which can be obtained by raising a request.
The step-by-step procedure to increase the vCPU quota is given below,
https://docs.microsoft.com/en-us/azure/azure-portal/supportability/per-vm-quota-requests
The step-by-step procedure to deploy a Virtual machine is given below,
- Type virtual machines in the marketplace search.
- Under Services, select Virtual machines.
- In the Virtual machines page, select Create Then Virtual machine.
- In the Basics tab, under Project details, make sure the correct subscription is selected and then choose to create a new resource group. Type Azure-PerformanceTest(user choice) for the name.
- Under Instance details, type Azure-VM (user choice) for the Virtual machine name and choose West Europe for Region. Choose CentOS, Version 8.1 HPC-Gen2 for the Image and Standard_ND96asr_v4 for the Size (user choice). Leave the other defaults.
Note:
- Region must be decided based on where the Virtual machine is going to be deployed. To avoid network latency, the region should be near the location where the VM is to be deployed.
- Image selection is of user choice based on the application user can choose the image (Windows 10, Linux based OS and Windows Server)
- Under Administrator account, provide a username, such as Azure user, and a password. The password must be at least 12 characters long and meet the defined complexity requirements.
- Under Inbound port rules, choose to Allow selected ports and then select SSH (22) from the drop-down.
- In the Advanced tab, under the Extensions click Select an extension to install, select NVIDIA GPU Driver Extension (user choice)
Note: This Step 8, will install the older version of Nvidia and Cuda driver hence the user can skip this step and proceed with the VM deployment without extension. Follow manual installation as per chapter 2.5.
- Leave the remaining defaults and then select the Review + create button at the bottom of the page.
- After validation runs, select the Create button at the bottom of the page.
- After deployment is complete, select Go to the resource.
For more information follow below link
https://docs.microsoft.com/en-us/azure/virtual-machines/linux/quick-create-portal
2.4 Connect to the virtual machine
Create an SSH connection to the virtual machine.
- On the overview page of a virtual machine, select the Connect button then select SSH and copy the public IP address.
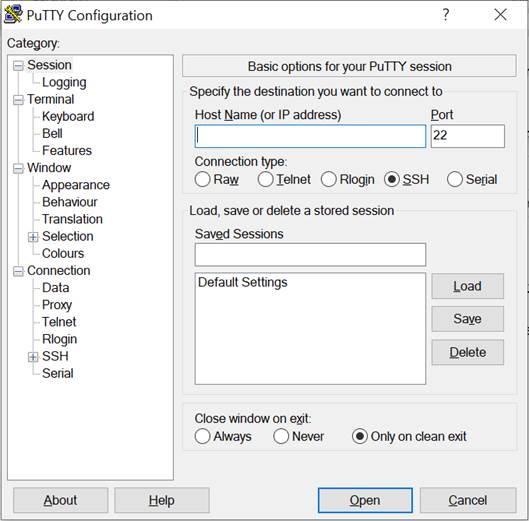
- Open any SSH client tool of user choice, in this case, PUTTY is used.
- Enter the IP address and port as 22 and click Open
- Enter username in Login, enter the password, and click Enter.
- Now user is connected to the VM in Console.
For more information follow below link
https://help.communicationsquare.com/article/103-how-to-connect-to-a-linux-vm-using-putty
2.5 Install Nvidia Drivers
To take advantage of the GPU capabilities of Azure N-series VMs backed by NVIDIA GPUs, the user must install NVIDIA GPU drivers.
If the machine has an NVLink or NV Switch connecting the GPUs like in the case of the NDv4 virtual machine, one should also install the associated version of the Nvidia fabric manager.
There are two ways to install the drivers,
- TheNVIDIA GPU Driver Extensioninstalls appropriate NVIDIA CUDA or GRID drivers on an N-series VM. Install or manage the extension using the Azure portal (Ref 8)
- Install NVIDIA GPU drivers manually. (For the manual installation follow the procedure given below)
Nvidia Data Center Driver installation guide for CentOS 8
The step-by-step instruction is given below,
- In some cases, the user may need to install some additional dependencies that are required
For installing the NVIDIA drivers.
# sudo dnf install -y tar bzip2 make automake gcc gcc-c++ pciutils elfutils-libelf-devel libglvnd-devel
- Enable the PowerTools repo and set up the external dependency on EPEL for DKMS.
# sudo dnf config-manager --set-enabled PowerTools
# sudo dnf install -y epel-release
- Install the CUDA repository public GPG key
# Distribution=rhel8
- Setup the CUDA network repository
# ARCH=$( /bin/arch)
# sudo dnf config-manager --add-repo http://developer.download.nvidia.com/compute/cuda/repos/$distribution/${ARCH}/cuda-$distribution.repo
- For CentOS 8, ensure that the system has the correct Linux kernel sources from the CentOS repositories:
# sudo dnf install -y kernel-devel-$(uname -r) kernel-headers-$(uname -r)
- Note that in some cases, the user may have to update the running kernel as a pre-requisite:
# sudo dnf install -y kernel kernel-core kernel-modules
- Update the repository cache and install the driver using the nvidia-driver meta-package
# sudo dnf clean all
# sudo dnf -y module install nvidia-driver:latest-dkms
- Install fabric manager to activate the NVswitch (For NDv4 instance)
# sudo dnf module install nvidia-driver:latest-dkms/fm
- Enable FM Service to Auto Start at Boot
# sudo systemctl enable nvidia-fabricmanager
Reference: https://docs.nvidia.com/datacenter/tesla/tesla-installation-notes/index.html#centos8/
3 Install Turbostream Application on Virtual Machine
3.1 Download product
Instructions on how to download the Turbo-stream application.
Before you begin, open the below link in a web browser and log in as a customer.
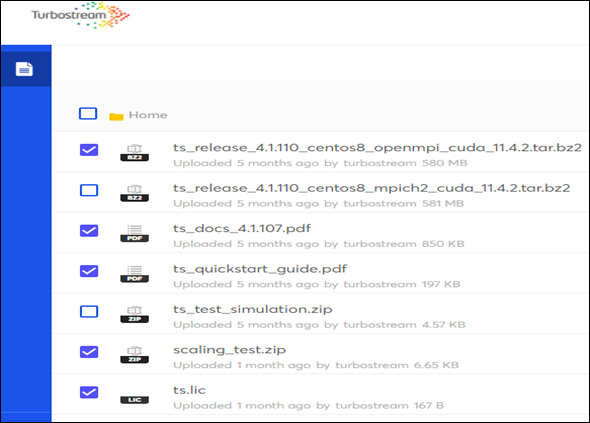
User will find the following:
- Release package for CentOS 8 with CUDA 11.4.2
- license file
- The Turbostream quickstart guide
- A test simulation pack (Scaling_Test)
- The Turbostream documentation
3.2 Install Turbostream application on Linux
3.2.1 Install the release distribution
The binary release distribution and license file for Turbo-stream can be obtained from the client’s website.
The relevant distribution will be named as follows:
ts_release_4.1.110_centos8_openmpi_cuda_11.4.2
Extract the release distribution as follows:
tar xjpvf ts_release_4.1.110_centos8_openmpi_cuda_11.4.2
after extracting the package installation will be complete.
3.2.2 Edit the bashrc_tsfile
Make the following changes as appropriate to the bashrc_ts file in the release distribution.
Location of the folder that release distribution was copied to
export TSHOME=$TSHOME/ts_release_4.1.110_centos8_openmpi_cuda_11.4.2
Location of the license file you have received
export TSLICENCE=$TSHOME /ts.lic
H5PY file setting
export PYTHONPATH=$TSHOME/h5py/lib/python3.8/site-packages:$PYTHONPATH
4 Performance results of Turbostream on Azure virtual machine
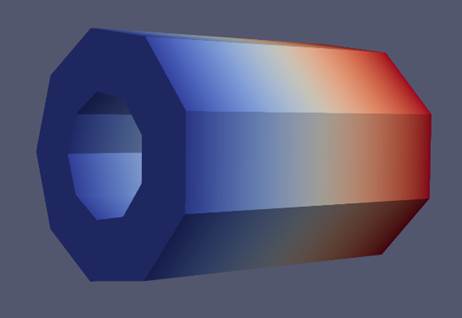
4.1 Turbostream Overview
Turbostream is a cloud-based computational fluid dynamics software for turbomachinery. The product offered is Turbostream. The key features of the product are speed and a multi-core processor. The software is provided both on-premises and on the cloud. Turbostream allows high-fidelity methods such as unsteady full-annulus simulations to be used as part of the routine design process for the first time.
4.2 Turbostream on Azure Platform
To carry out the CFD simulations on Turbostream software, the right hardware with the latest CPUs and GPUs are required. Microsoft partnered with Nvidia provides the required and suitable Infrastructure and hardware on the Azure cloud platform. It provides the latest and fastest computes capabilities for GPU-intensive workloads.
|
Operating system and Nvidia drivers Details |
|
|
Operating system version |
CentOS Linux release 8.1.1911 (Core) |
|
OS Architecture |
X86-64 |
|
GPU Drivers version |
470.57.02 |
|
Cuda version |
11.4 |
4.3 Model Details
The parameters are as follows:
N1: Number of grid nodes in the axial direction
N2: Number of grid nodes in the circumferential and the radial directions
NGPU: Number of GPUs to use
NGPU_NODE: Number of GPUs per node
|
Model |
No. of GPUs |
No. of Grid nodes (In million) |
|
Model 1 |
1 |
6 |
|
Model 2 |
2 |
12 |
|
Model 3 |
4 |
24 |
|
Model 4 |
8 |
48 |
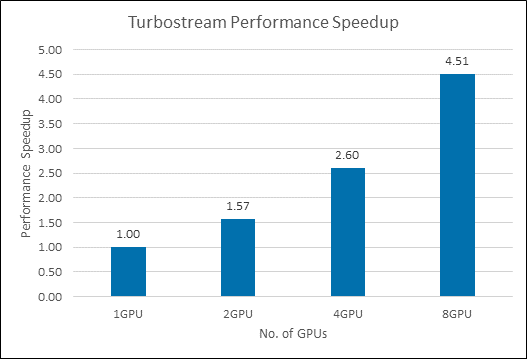
4.4 Turbostream Performance Results
To Analyse the performance of Turbostream we carried out simulations. These performance tests aim to test the simulation performance on chosen Azure VM. The results are presented below
4.4.1 Performance Calculation
Performance is the number of grid nodes processed per second. Each model's performance is calculated using the formula below.
perf = nnode/time
To calculate relative performance, normalise all GPUs performance with 1 GPU
Relative perf = perf/perf [1]
|
No. of GPUs |
N1 |
N2 |
Time per iteration (sec) Average of 200 iterations |
Performance |
Relative Performance |
|
1 |
600 |
100 |
0.0743 |
80753701.21 |
1 |
|
2 |
1200 |
100 |
0.0944 |
127118644.1 |
1.57 |
|
4 |
2400 |
100 |
0.1145 |
209606986.9 |
2.60 |
|
8 |
4800 |
100 |
0.1319 |
363912054.6 |
4.51 |
5 Azure Cost
For the below cost reports, the application installation time is not considered and only wall clock time is considered for the cost calculation.
6 Summary
- Turbostream is successfully tested on NDv4-A100 Virtual Machine.
- We can see that the performance is scaling well up to 8 GPUs.
2 Deploy Virtual Machine on Azure Cloud Platform
2.1 Azure Cloud Architecture for Application
2.2 Azure Virtual Machine (VM)
2.3 Create a Virtual Machine on Azure Platform
2.4 Connect to the virtual machine
3 Install Turbostream Application on Virtual Machine
3.2 Install Turbostream application on Linux
3.2.1 Install the release distribution
4 Performance results of Turbostream on Azure virtual machine
4.2 Turbostream on Azure Platform