

Azure HPC Recipe Document for Autodesk VRED
This document briefly explains the steps to install and run Autodesk VRED application on a Virtual Machine deployed in Azure Cloud Platform and presents the performance results.
This recipe document covers the following topics: -
- Deploy & connect a required virtual machine on Azure platform.
- Install required NVIDIA drivers in virtual machine.
- Install Application on virtual machine.
- Install license manager for current application
- Performance results of current application on azure virtual machine
- Azure Cost
- Summary
2 Deploy Virtual Machine on Azure Cloud Platform
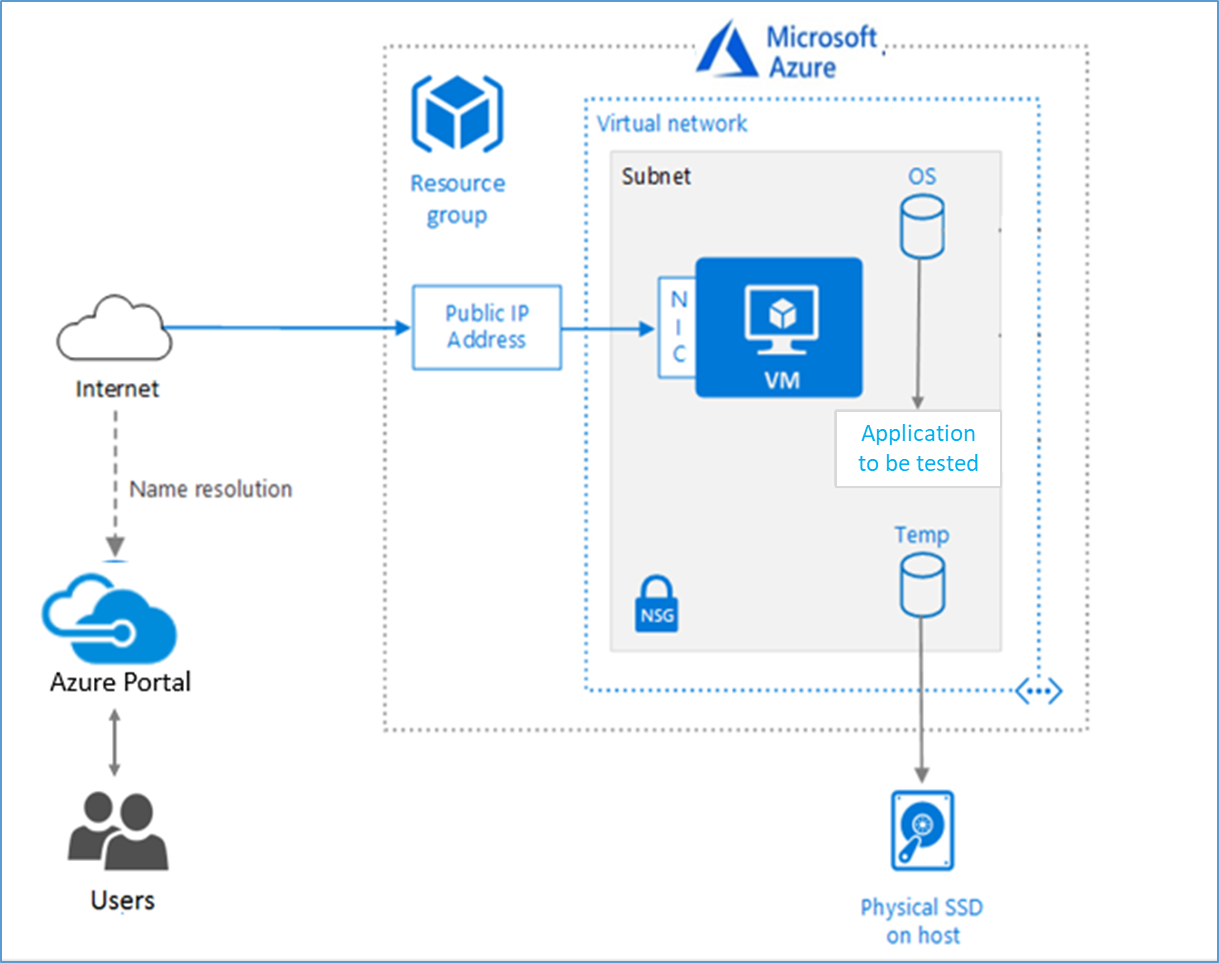
2.1 Azure Cloud Architecture for Application
The below Architecture explains the virtual machine running on an Azure Platform
2.2 Azure Virtual Machine (VM)
A VM is a virtualized instance of a computer that can perform almost all of the same functions as a computer, including running applications and operating systems.
An Azure VM gives the flexibility of virtualization without having to buy and maintain the physical hardware that runs it. However, user still need to maintain the VM by performing tasks, such as configuring, patching, and installing the software that runs on it.
Things to be considered before deploying a VM,
- The names of the application resources
- The location where the resources are stored
- The size of the VM
- The operating system that the VM runs
- The configuration of the VM
- The related resources that the VM needs
There are different sizes and options for the Azure virtual machines one can use to run apps and workloads. Depending on the workload user has to choose the appropriate VM size or complete list check this https://docs.microsoft.com/en-us/azure/virtual-machines/sizes/.
The performance of Autodesk VRED on Azure Platform NC64as_T4_v3 & NV48s_v3 virtual machines are deployed to analyse the hardware performance.
|
Size |
vCPU |
Memory: GiB |
Temp storage (SSD) GiB |
# GPU |
GPU memory: GiB |
Max data disks |
|
Standard_NC64as_T4_v3 |
64 |
440 |
2880 |
4 |
64 |
32 |
|
Standard_NV48s_v3 |
48 |
448 |
1280 |
4 |
32 |
32 |
To Analyse the performance of Autodesk VRED on Azure Platform NCasT4_v3-series VM is deployed. These Series VMs are powered by Nvidia T4 GPUs and AMD EPYC 7V12(Rome) CPUs. The “NC64as_T4_v3” VM has 4 NVIDIA T4 GPUs with 16 GB of memory each, up to 64 non-multithreaded AMD processor cores with a total memory of 448GB.
Another VM of NVv3-series is deployed and is powered by NVIDIA M60 GPUs and Intel E5-2690 v4 (Broadwell) CPUs (2.60GHz). The “NV48s_v3” VM has NVIDIA Grid Technology with Intel cores and Intel Hyper-Threading Technology. Each GPU in NVv3 instances comes with a GRID license, this license gives the flexibility to use an NV instance as a virtual workstation for a single user, or 25 concurrent users can connect to the VM for a virtual application scenario
2.3 Create a Virtual Machine on Azure Platform
Sign in to Azure
Sign into the Azure portal by using https://portal.azure.com/
Free Trial subscriptions aren't eligible for limit or quota increases. If user have a Free Trial subscription, user can upgrade to a Pay-As-You-Go subscription
After the successful sign in or sign up, one has to upgrade the Azure subscription to Pay-As-You-Go to deploy a Virtual machine. For deployment, the user must have regional vCPU quota which can be obtained by raising a request.
The step-by-step procedure to increase the vCPU quota is given below,
https://docs.microsoft.com/en-us/azure/azure-portal/supportability/per-vm-quota-requests
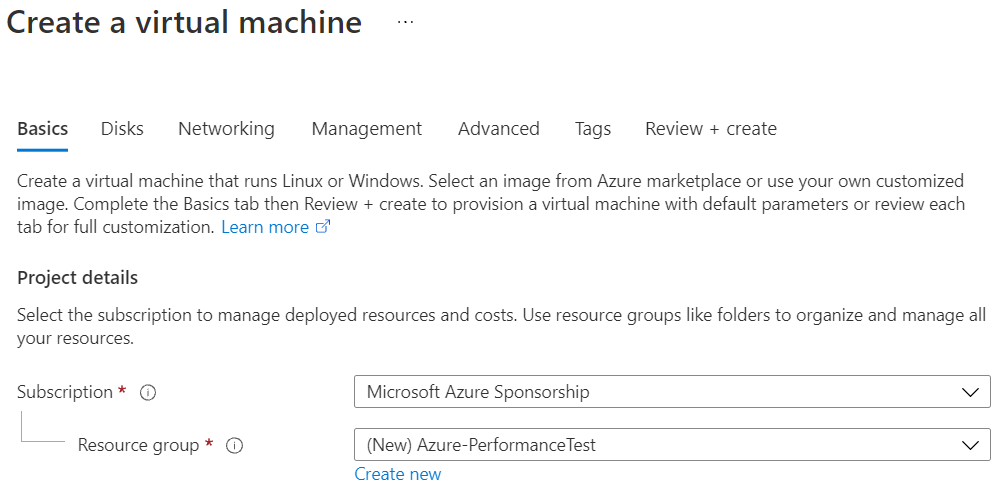
The step-by-step procedure to deploy Virtual machine is given below,
1. Type virtual machines in the marketplace search.
2. Under Services, select Virtual machines.
3. In the Virtual machines page, select Create Then Virtual machine.
4. In the Basics tab, under Project details, make sure the correct subscription is selected and then choose to Create new resource group. Type Azure- PerformanceTest (user choice) for the name.
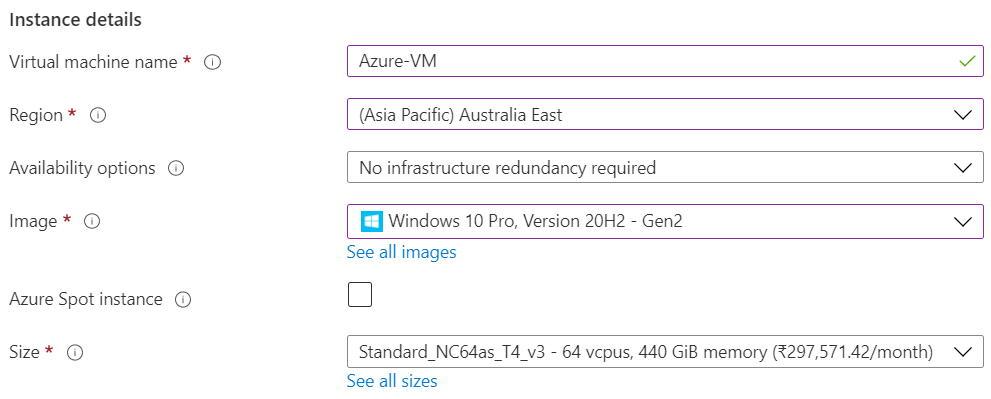
5. Under Instance details, type Azure-VM (user choice) for the Virtual machine name and choose Australia East for your Region. Choose Windows 10 pro, Version 20H2-Gen2 for the Image and Standard_NC64as_T4_v3 for the Size (user choice). Leave the other defaults.
Note:
- Region must be decided based on where you are going to deploy a Virtual machine. To avoid the network latency, the region should be near to the location where the VM is to be deployed.
- Image selection is of user choice based on the application user can choose the image (Windows 10, Linux based OS and Windows Server)
6. Under Administrator account, provide a username, such as Azureuser and a password. The password must be at least 12 characters long and meet the defined complexity requirements.

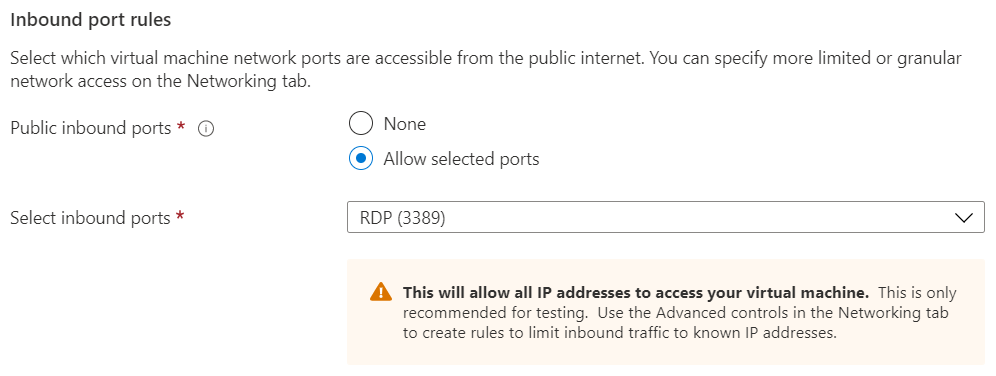
7. Under Inbound port rules, choose Allow selected ports and then select RDP (3389) and HTTP (80) from the drop-down.
8. Under the Licencing click the check box

9. In Advanced tab, under the Extensions click Select an extension to install, select NVIDIA GPU Driver Extension (user choice)
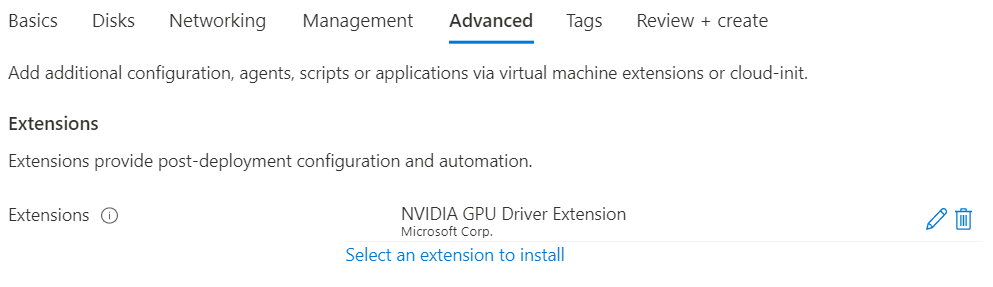
10. Leave the remaining defaults and then select the Review + create button at the bottom of the page.
11. After validation runs, select the Create button at the bottom of the page.
![]()
12. After deployment is complete, select Go to resource.

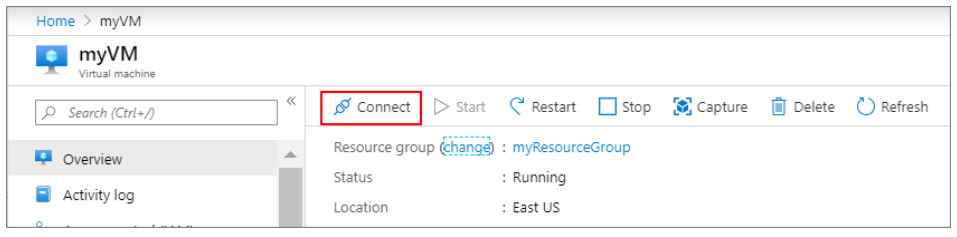
2.4 Connect to virtual machine
Create a remote desktop connection to the virtual machine. These directions tells user how to connect to a VM from a Windows computer. On a Mac, user need an RDP client such as this Remote Desktop Client from the Mac App Store.
1. On the overview page for a virtual machine, select the Connect button then select RDP.
2. In the Connect with RDP page, keep the default options to connect by IP address, over port 3389, and click Download RDP file.
3. Open the downloaded RDP file and click Connect when prompted.
4. In the Windows Security window, select More choices and then Use a different account. Type the username as localhost\username, enter the password created for the virtual machine, and then click OK.
5. User may receive a certificate warning during the sign-in process. Click Yes or Continue to create the connection.
To take advantage of the GPU capabilities of Azure N-series VMs backed by NVIDIA GPUs, user must install NVIDIA GPU drivers.
In two ways user can install the drivers,
3 Install VRED Application on Virtual Machine:
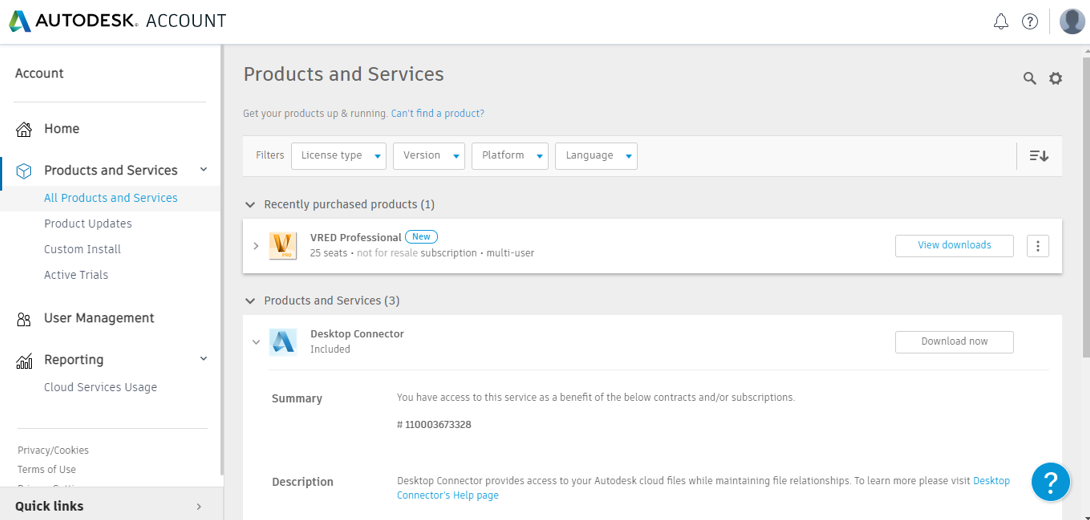
For installing Autodesk VRED on Azure VM, first go to user’s Autodesk Account, check for the purchased products available in user account under the tab Products and Services. Here in current scenario installed VRED Professional.
3.1 License Manager Installation
As a prerequisite to install VRED Application on Azure Virtual Machine, Autodesk Network License Manager need to be installed on the VM.
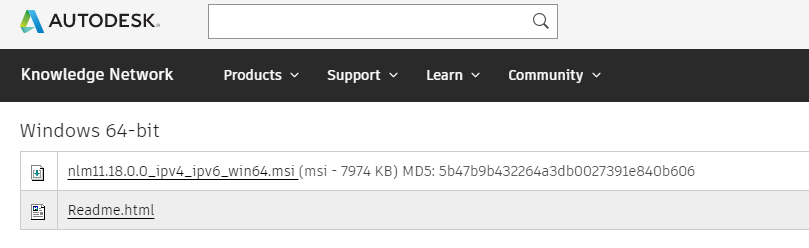
Autodesk Network License Manager for windows platform can be found in the below link: https://knowledge.autodesk.com/search-result/caas/downloads/content/autodesk-network-license-manager-for-windows.html
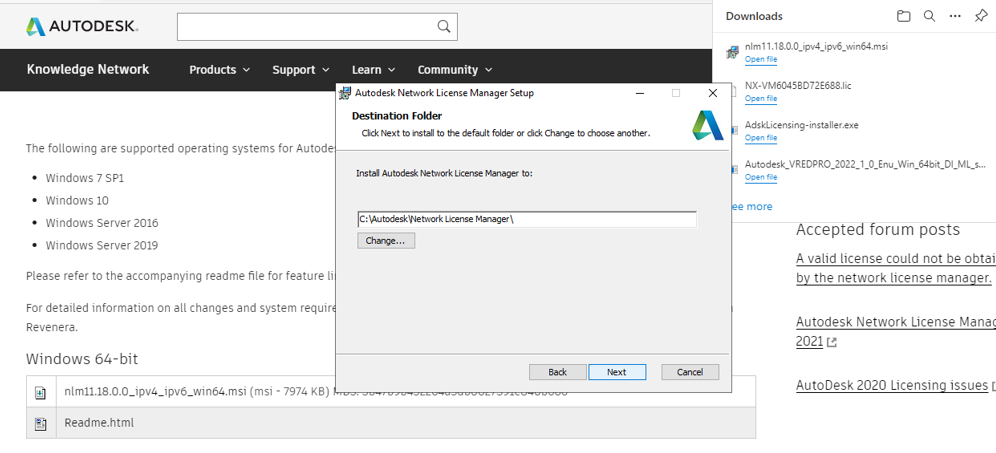
User can install the Autodesk Network License Manager setup as shown in the below figure. Once user installs the setup, a folder with name Network License Manager will be created in the path “C:\Autodesk\Network License Manager\ “
Now generate the license file from user’s Autodesk account, and keep the license file in the Network License Manager folder. Create a text file with name “debug.log” and keep it in the same Network License Manager folder.
Generating license file:
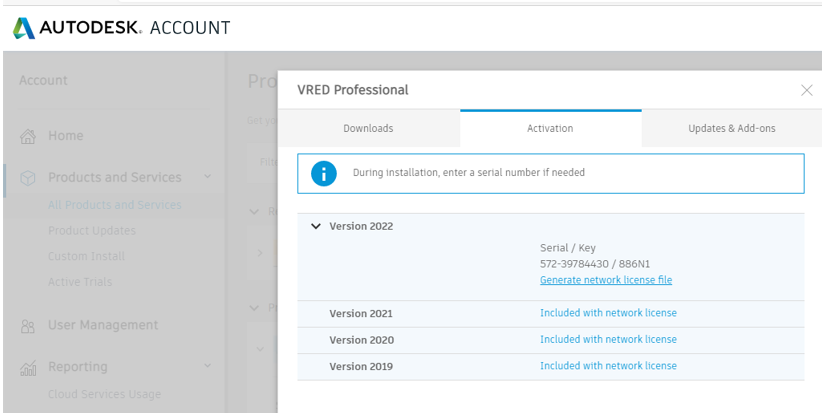
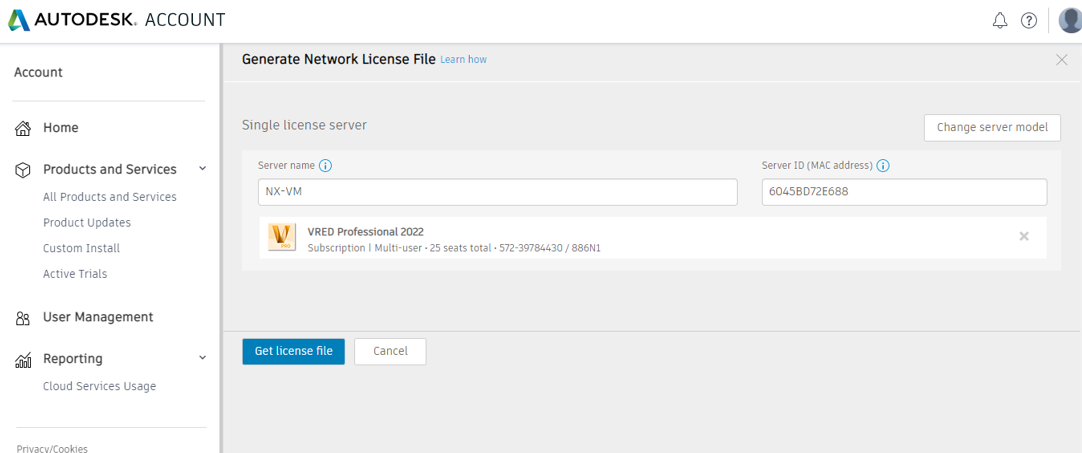
From the Autodesk account, Select VRED Professional downloads, open the above GUI and click on Generate network license file. In this case Network License file for VRED Professional is used. User can find their type of license from Products and Services tab in the Autodesk account. For next step user will be required to fill the details of Server or VM Name and Physical address. Physical Address or MAC address, one can get by typing “ipconfig /all” in the command prompt. After filling those details and selecting the Product for which license has to be generated, user can click on Get License File, the license file will be generated.
Below figure shows the above explained steps.
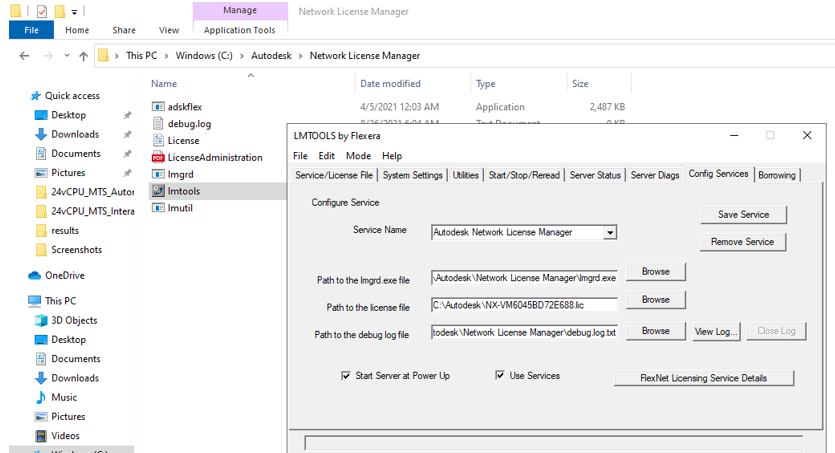
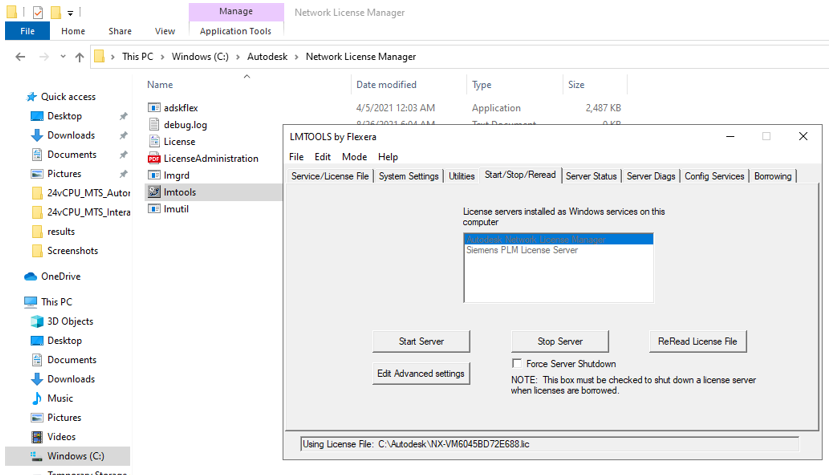
From the windows search bar, open lmtools, a GUI will open as shown below. Select Config Services and name the service name, in this case it named as Autodesk Network License Manager. Give the license file path where we placed it and also fill the other paths as shown here. Now tick mark the ‘Start Server at Power Up’ at bottom and select ‘Save Service’ button and then follow the automatic messages which will pop up.
Now select the Start/Stop/Reread button from the top ribbon and then select Start Server as shown in the figure below. The service name – ‘Autodesk Network License Manager’ should be seen under blue colour.
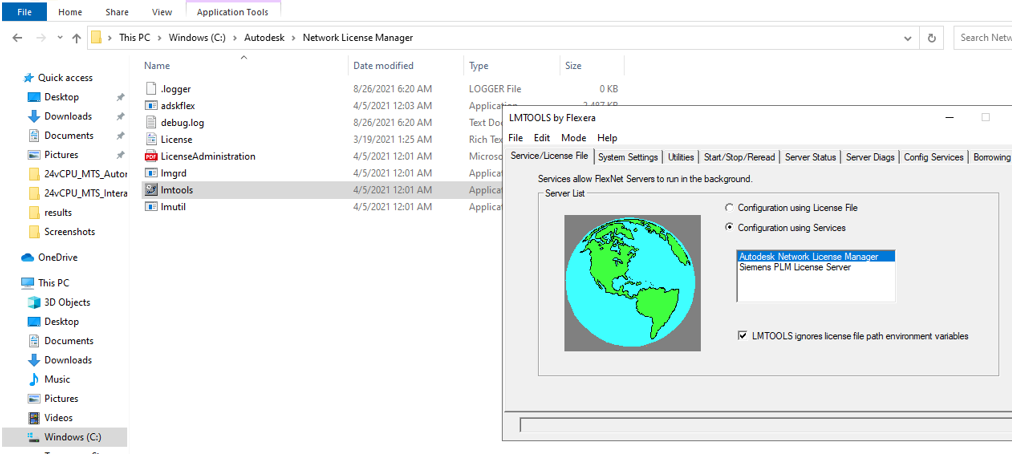
Once user clicks on start server, the below GUI should show up with service name “Autodesk Network License Manager”. Now the License Manager installation is complete. User can start downloading the VRED application and install it in the same Virtual Machine
3.2 Product download and Install procedure
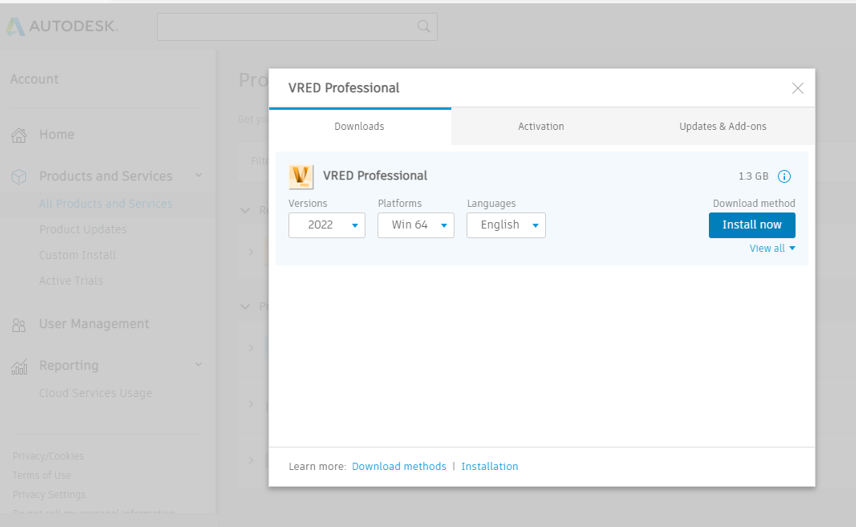
From the Autodesk account, go to products purchased and then select the product, in this case VRED Professional and click on downloads, then this GUI will open, user can see Install now option. Click on that and follow the prompt, VRED application will be installed.
4 Performance results of Autodesk VRED on Azure Virtual Machines
Autodesk VRED is a visualization software which helps Automotive Designers and Engineers create product presentations, design reviews and virtual prototypes using interactive CPU and GPU ray tracing. Autodesk VRED, which was previously limited to CPU, now leverages GPU technology to support the high demands of consumers and provide interactive ray tracing and AI-powered Denoising. This allows users to gain immediate visual feedback to see how a vehicle’s aesthetics will interact with different environments in real time
Autodesk VRED enables users to create digital prototypes so they can gain insight into how vehicles will look and perform. To be effective in guiding design decisions, the digital prototypes need to look and behave as close as possible to the real thing
The term rendering defines the automatic process of generating digital images from three-dimensional models, by means of a special software. These images simulate project or 3D model’s photorealistic environments, materials, lights and objects.
Types of Rendering
Rendering Real Time: Real-time rendering is mainly used in gaming and interactive graphics, where images are calculated from 3D information at a very fast pace. As a result, dedicated graphics hardware have improved the performance of real-time rendering ensuring rapid image processing.
Rendering offline: Offline rendering is a technique mainly used in situations where the need for processing speed is lower. Visual effects work where photorealism needs to be at highest standard possible. There is no unpredictability, unlike real time
4.2 Autodesk VRED on Azure Platform:
When it comes to performance parameters, rendering is one parameter which need to be carried out on visualization and design software. Often designers spend a lot of time in rendering process. With advanced capabilities like CPU & GPU ray tracing, VRED has drastically reduced the Render times over the period. To carry out these complex and heavy rendering simulations on VRED software, right hardware is must. Microsoft partnered with Nvidia provides the required and suitable Infrastructure and hardware on Azure cloud platform. Microsoft Azure provides the latest and fastest compute capabilities for both CPU & GPU intensive workloads.
4.3 Autodesk VRED Settings for expected performance
For the current expected performance activity, carried out offline image rendering task and calculated the render times for CPU ray tracing and GPU Ray tracing. We carried out this activity with varying GPU number from the VRED application, and then compared the render time differences between CPU & GPU raytracing.
4.3.1 Opening Autodesk VRED Model
Open the VRED Application and load the VRED Model into the application, here in this case using a prebuilt car model.
|
|
|
Ray tracing
Ray tracing is a rendering technique that can produce incredibly realistic lighting effects. Ray tracing generates lifelike shadows and reflections, along with much-improved translucence and scattering, taking into account light phenomena such as reflection and refraction. The popularity gained by ray tracing lays the foundation in the realistic simulation of light compared to other rendering models (such as scanline rendering or ray casting).
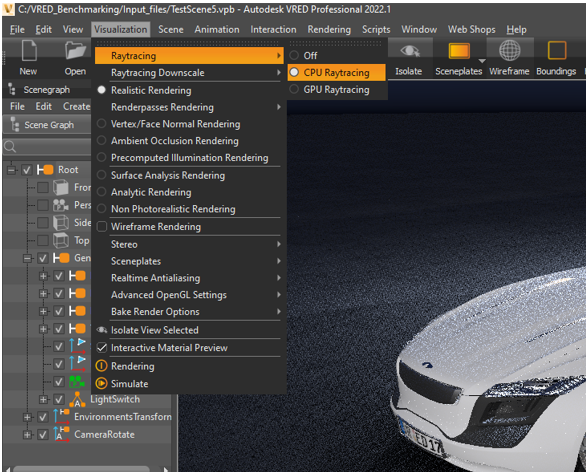
We can activate the CPU and GPU Raytracing options in VRED based on our Rendering requirements. Below figure shows how to activate CPU/GPU Raytracing in VRED application
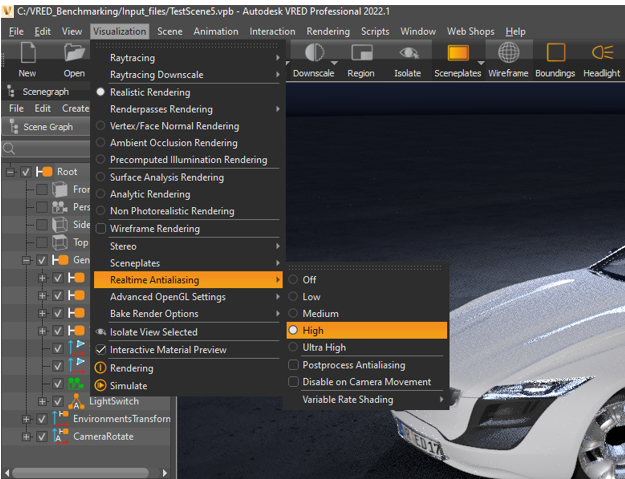
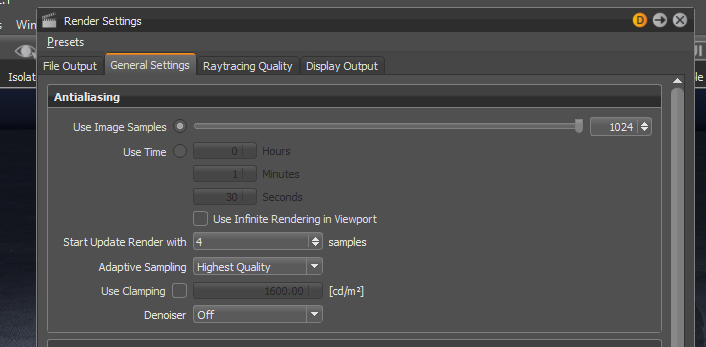
For the CPU and GPU raytracing rendering, we have kept the antialiasing option to high as shown in the figure below
For render setting select the render option in VRED as shown below
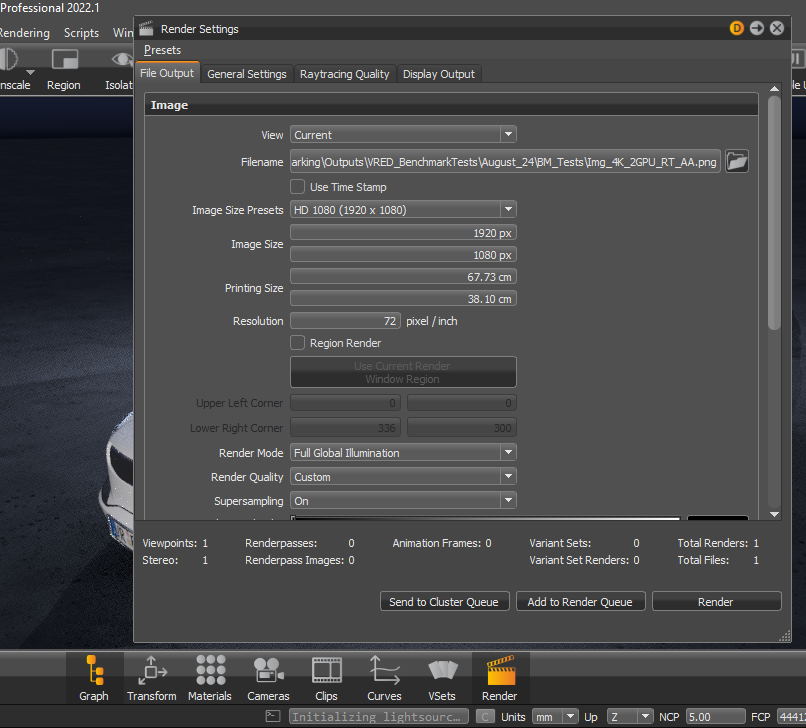
Saving the Images: User can save the image rendered in the desired location or path in desktop from selecting the option under Image option from Render settings tab. The image size like HD or 4K is also selected from the dropdown box under Image Size Presents. Here we have selected HD Image
General Settings: For CPU and GPU Raytracing, Image samples have to be selected for Antialiasing, more the number the number of samples, better the antialiasing output. Under general settings, we have selected the maximum number, 1024 Image samples for Antialiasing. For open GL less number can be selected like 16 to 32 samples.
Raytracing Quality:
For Illumination mode for both interactive and still frame mode, Full Global Illumination option is selected under the Raytracing Quality settings
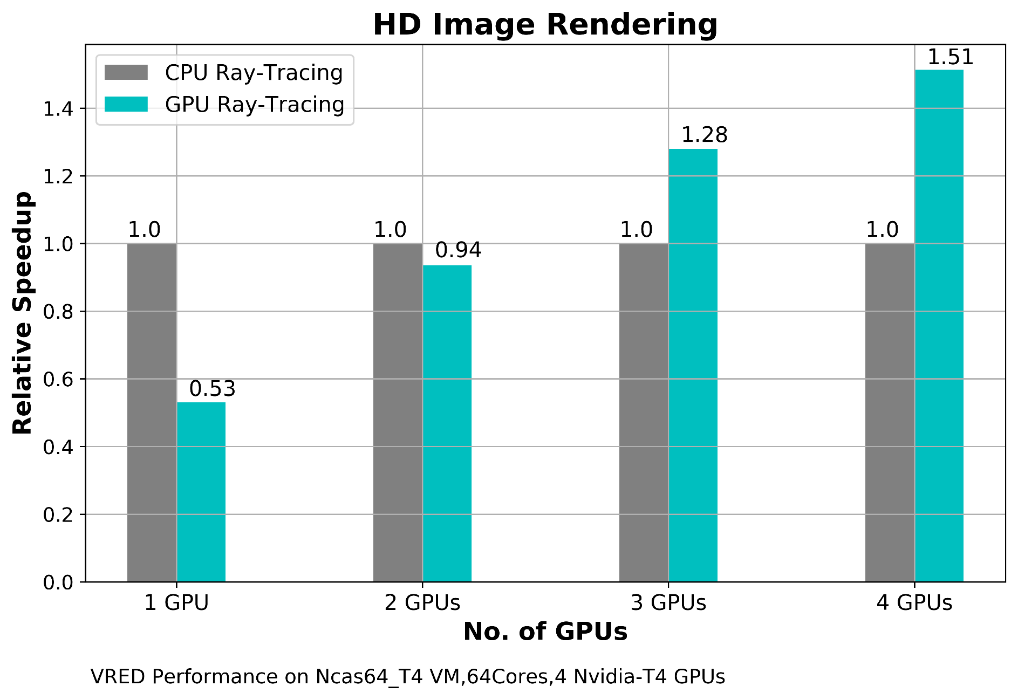
4.4 Autodesk VRED Performance Results
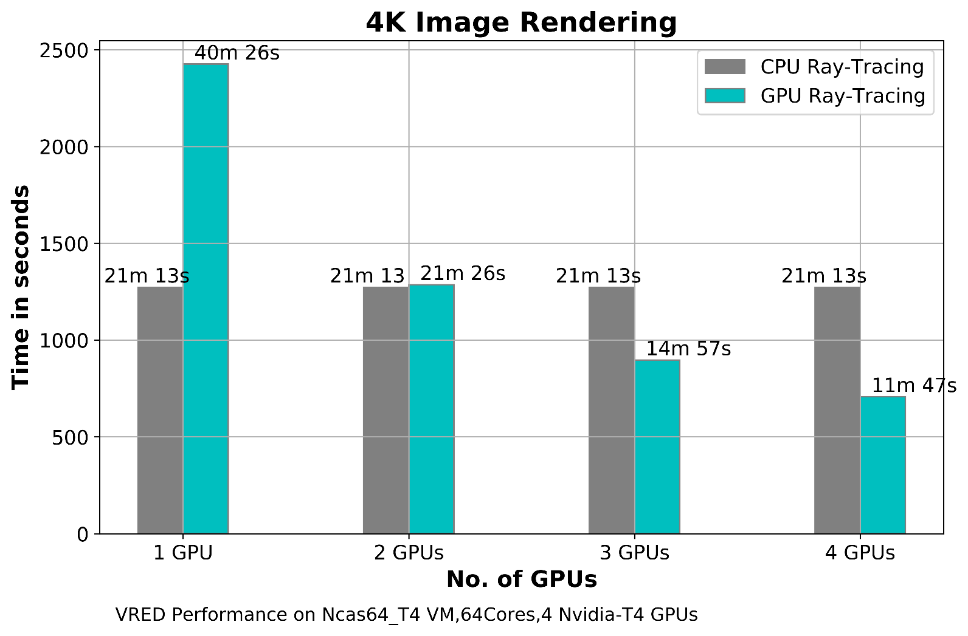
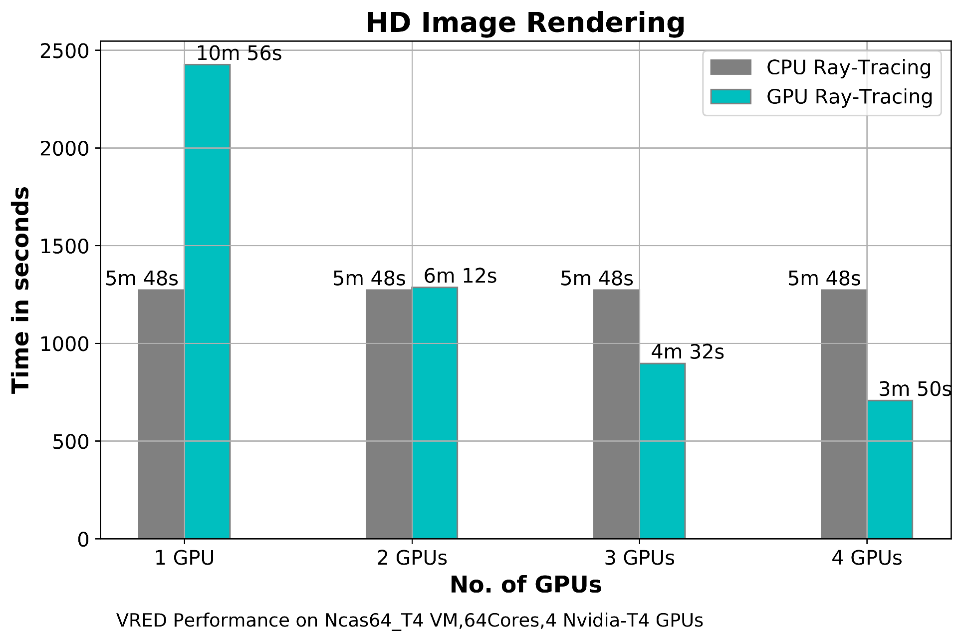
To Analyse the performance of VRED, carried out Rendering using CPU and GPU raytracing for 4K and HD Images, and then compared CPU, GPU render times. The aim of this rendering process is to compare the GPU Rendering performance with respect to CPU Rendering. For CPU rendering, the application is utilizing all the 64 Cores. We then performed GPU rendering with varying GPU numbers 1,2,3 and 4 on the same VM. The below graphs show all the results,
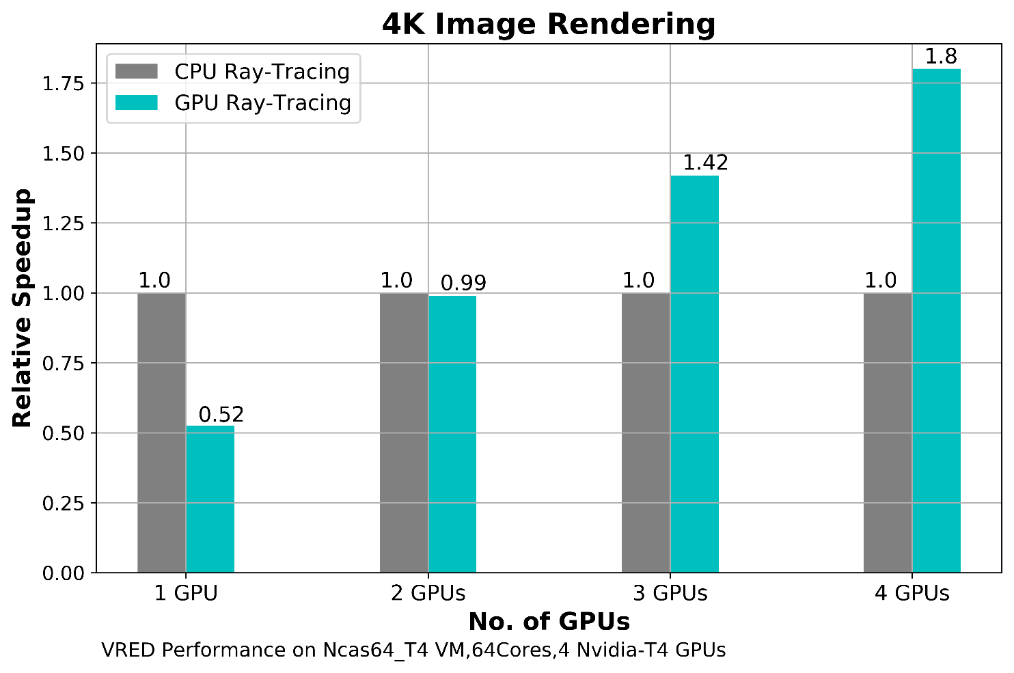
Relative speedup between CPU and GPU raytracing:
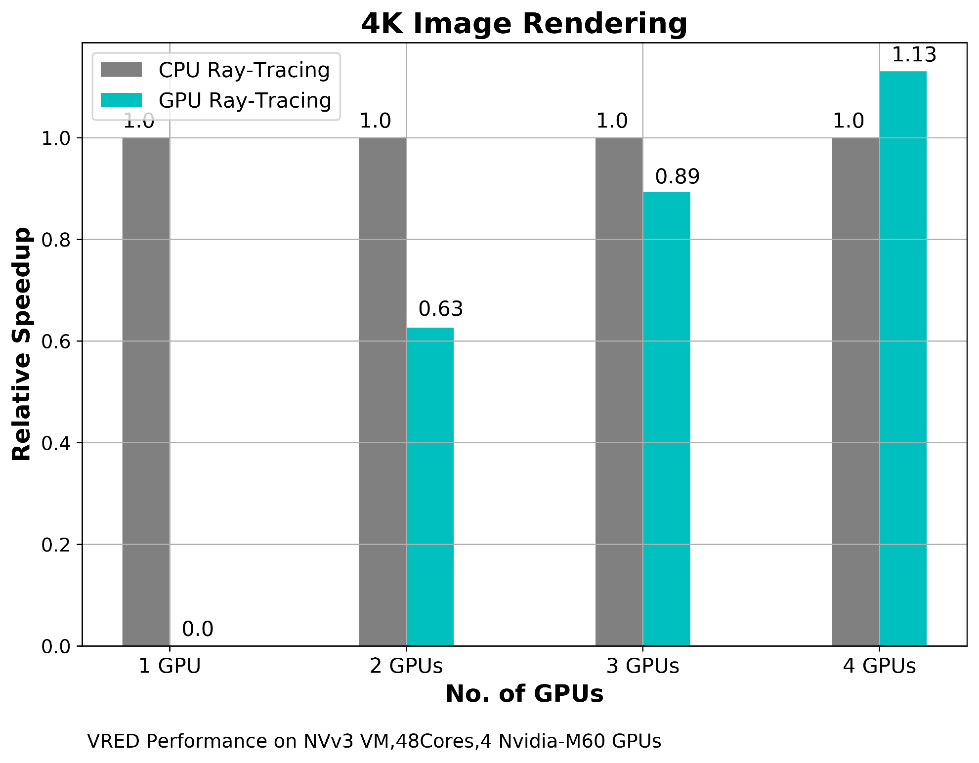
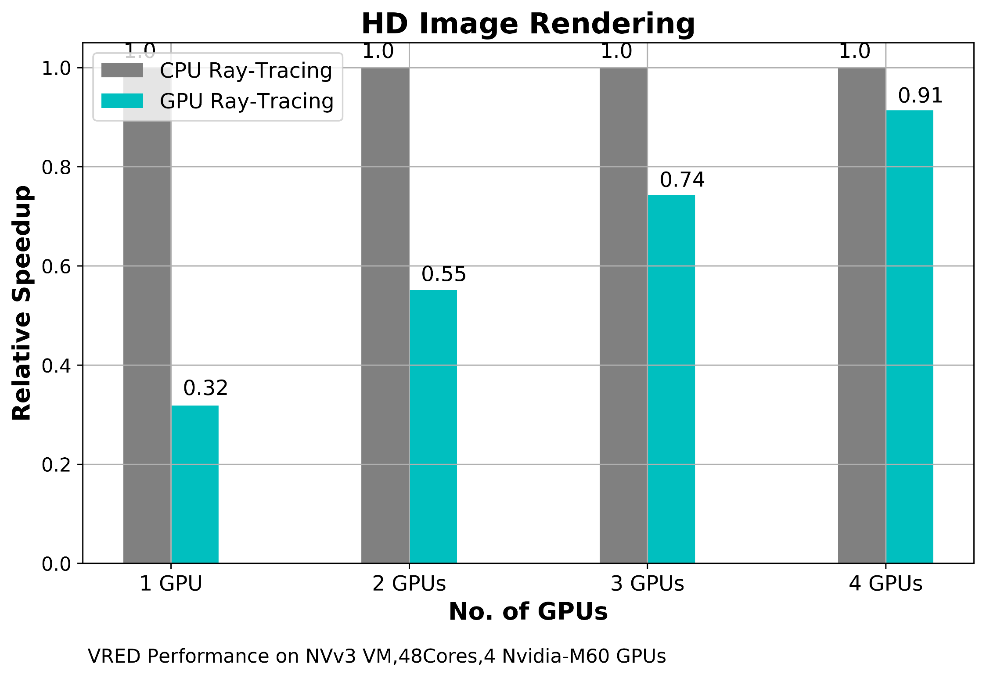
4.5 Autodesk VRED Performance Results on NVv3 VM
The below graphs shows the performance results for NVv3 VM.
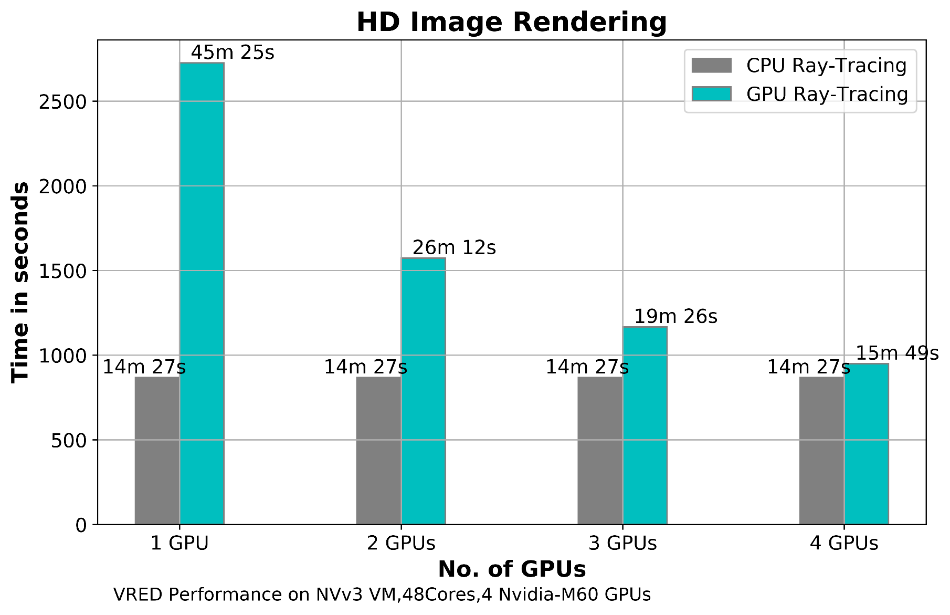
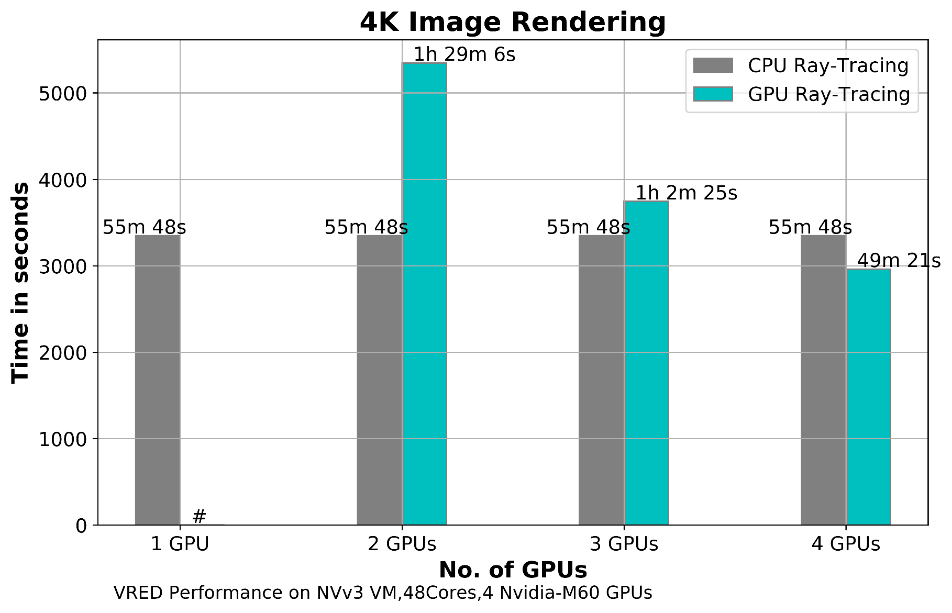
Note: GPU Rendering with 1 GPU settings on NVv3 VMs, application produced an error while rendering with 4K and higher resolution setting. It works fine with HD image rendering. It depends on the model complexity and environment setting for the model. For larger scale models, 1 GPU setting is not recommended.
Relative speedup between CPU and GPU raytracing:
For the below cost reports, the application installation time and pre-processing time is not considered, only considered the rendering time for 4K and HD images. The Hourly rates reported are subject to change. For the current rate please refer the link “https://azure.microsoft.com/en-in/pricing/calculator/”.
GPU Rendering cost for 4K Image on Azure VMs
|
VM Name |
# GPUs on VM |
Azure VM hourly cost ($) |
4K Image Render time |
Total Azure Cost |
|
NC64as_T4_v3 |
4 |
$8.60 |
11 min 47 sec |
$1.69 |
|
NV48s_v3 |
4 |
$8.59 |
49 min 21 sec |
$7.06 |
CPU Rendering cost for 4K Image on Azure VMs
|
VM Name |
No. of CPU cores |
Azure VM hourly cost ($) |
4K Image Render time |
Total Azure Cost |
|
NC64as_T4_v3 |
64 |
$8.60 |
21 min 13 sec |
$3.04 |
|
NV48s_v3 |
48 |
$8.59 |
55 min 48 sec |
$8.00 |
GPU Rendering cost for HD Image on Azure VMs
|
VM Name |
# GPUs on VM |
Azure VM hourly cost ($) |
HD Image Render time |
Total Azure Cost |
|
NC64as_T4_v3 |
4 |
$8.60 |
3 min 48 sec |
$0.54 |
|
NV48s_v3 |
4 |
$8.59 |
15 min 49 sec |
$2.26 |
CPU Rendering cost for HD Image on Azure VMs
|
VM Name |
No. of CPU cores |
Azure VM hourly cost ($) |
HD Image Render time |
Total Azure Cost |
|
NC64as_T4_v3 |
64 |
$8.60 |
5 min 48 sec |
$0.83 |
|
NV48s_v3 |
48 |
$8.59 |
14 min 27 sec |
$2.07 |
1. VRED Application is successfully deployed and tested on NCas_T4_v3 series VMs and NVv3 series Virtual Machines on Azure Platform
2. NC64as_T4 VM, GPU rendering is 1.8 times faster than the CPU rendering.
3. NC64as_T4 Virtual Machine is recommended for VRED application as it demonstrated a better performance for both CPU and GPU rendering timelines.
4. For NVv3 VM, it was observed that there isn’t much improvement in GPU rendering times compared to CPU rendering time.
2 Deploy Virtual Machine on Azure Cloud Platform
2.1 Azure Cloud Architecture for Application
2.2 Azure Virtual Machine (VM)
2.3 Create a Virtual Machine on Azure Platform
2.4 Connect to virtual machine
3 Install VRED Application on Virtual Machine:
3.1 License Manager Installation
3.2 Product download and Install procedure
4 Performance results of Autodesk VRED on Azure Virtual Machines
4.2 Autodesk VRED on Azure Platform:
4.3 Autodesk VRED Settings for expected performance
4.3.1 Opening Autodesk VRED Model
4.4 Autodesk VRED Performance Results on NCas_T4 VM